Introduction
NexusLMS is a corporate training platform: a Laravel backend with an admin panel and a learner web portal, a REST API, and a Flutter mobile app for iOS and Android. Admins build courses, quizzes and assignments and assign them to departments; employees learn in the browser or on their phone.
- Admin panel (
/admin): courses, modules and lessons, quizzes, assignments and grading, learning paths, live classes, certificates, departments, users, roles and permissions, notifications, reports and settings. - Learner portal (
/portal): employees take courses, quizzes and assignments, join live classes, view and print certificates, and verify credentials in the browser. - REST API (
/api/v1): token-based API used by the mobile app. - Mobile app: the learner experience on iOS and Android, including push notifications.
This documentation is for version 1.0.0. It is a single page that opens offline from the documentation folder.
It is also online, always in its latest version, at shamimcse1.github.io/nexuslms-docs. Use the search box at the top of the menu (or press /) to find any topic.
Admin:
admin@nexuslms.internal / Admin@123456Learner (portal and app):
employee@corporation.com / Password@123All demo accounts are in Demo Instructions.
What's in the package
| Folder | What it is |
|---|---|
main/backend/ | Laravel application: admin panel, learner portal, REST API and web installer (Laravel 13, PHP 8.3+). |
main/mobile/ | Flutter app for learners (Android and iOS). |
documentation/ | This documentation and its screenshots (assets/). |
The backend comes without the folders Composer and npm create (vendor/, node_modules/ and public/build/), and the app without Flutter's build/ folder. The first setup steps add them.
Quick start
Setting up takes five steps. Click a step to jump to its instructions.
- Install the backendInstall the PHP packages, build the web assets, upload the files and run the web installer.
- Set up the admin panelSign in, set your site name, logo and time zone, then add departments, people and courses.
- Connect emailA mail server is needed for password resets. Push notifications are optional.
- Build the mobile appSet your API address, rename the app, change the icon and build it.
- Go liveWork through the going-live checklist before inviting people.
Requirements
- Server: PHP 8.3 or newer with BCMath, Ctype, cURL, DOM, Fileinfo, Filter, Hash, JSON, Mbstring, OpenSSL, PCRE, PDO, PDO MySQL, Tokenizer and XML; MySQL 8.0+ or MariaDB 10.6+; Apache or Nginx with the document root on
public; HTTPS; a cron job. Composer 2 and Node.js 20.19+ or 22.12+ are needed to install, not to run. No queue worker is needed. - Mobile app: Flutter 3.44 or newer (Dart 3.12+). Android Studio with Android SDK 36; the app runs on Android 7.0 (API 24) and newer. A Mac with Xcode 16+ and CocoaPods for iOS; the app runs on iOS 15 and newer.
- Accounts: a mail (SMTP) provider; a Firebase project if you want push notifications (optional); a Google Play developer account and the Apple Developer Program to publish the app.
Demo Instructions
Try NexusLMS before you install it. The demo resets its sample data every 15 minutes and does not send email.
- Admin panel: https://nexuslms.dev-shamim.com/admin/login
- Learner portal: https://nexuslms.dev-shamim.com/portal/login
- Android app: download the demo APK; it connects to the live demo.
Demo logins
| Account | Sign in at | Password | |
|---|---|---|---|
| Super Admin | Admin panel | admin@nexuslms.internal | Admin@123456 |
| Company Admin | Admin panel | admin@corporation.com | Admin@123456 |
| Learner | Learner portal and Android app | employee@corporation.com | Password@123 |
The sign-in pages also list these accounts; click one to fill it in. These logins are for the online demo only. On your own installation, sign in with the administrator you create in the installer.
Backend & admin panel
The backend in main/backend is a Laravel 13 application. It serves the admin panel at /admin, the learner portal at /portal, the REST API at /api/v1 and the web installer at /install.
Installation
- Upload the contents of
main/backendto your server, for example to/var/www/nexuslms. - Point your domain's document root to the
publicfolder inside it. - Install the PHP packages:
cd /var/www/nexuslms composer install --no-dev --optimize-autoloader - Build the web assets (CSS and JavaScript):
npm ci npm run build - Make the storage and cache folders writable by the web server:
(Use your web server's user instead ofchmod -R 775 storage bootstrap/cache chown -R www-data:www-data storage bootstrap/cachewww-dataif it differs.) - Create an empty MySQL database and a database user with full access to it.
- Open
https://your-domain.com/installin your browser and follow the web installer.
Web installer
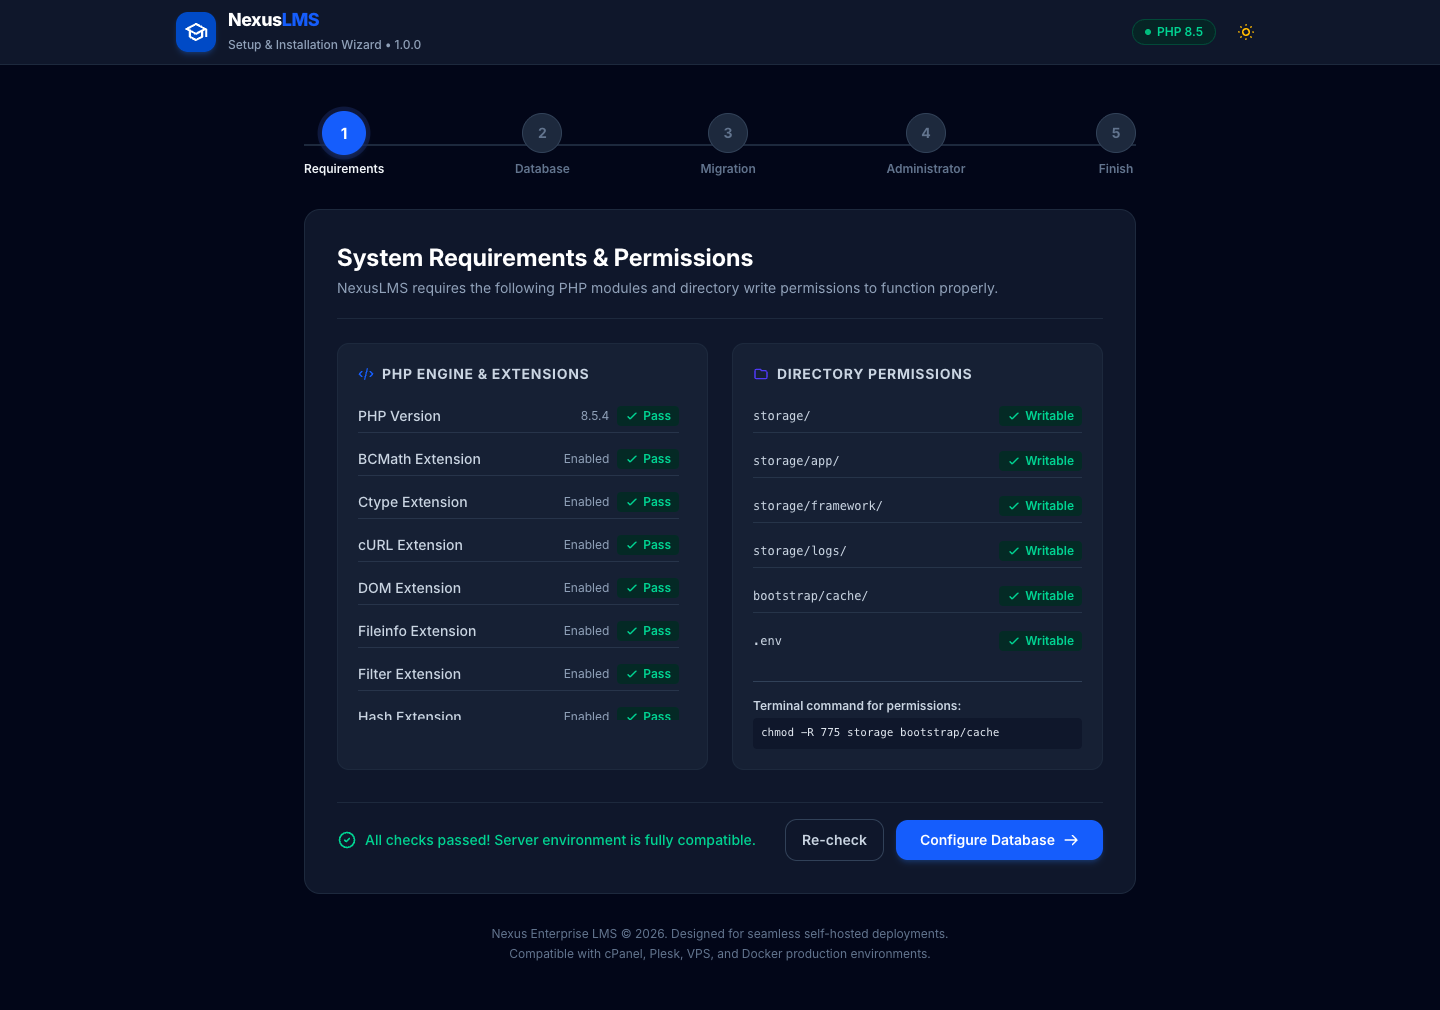
- Requirements: checks the PHP version, extensions and folder permissions. Fix anything marked red before continuing.
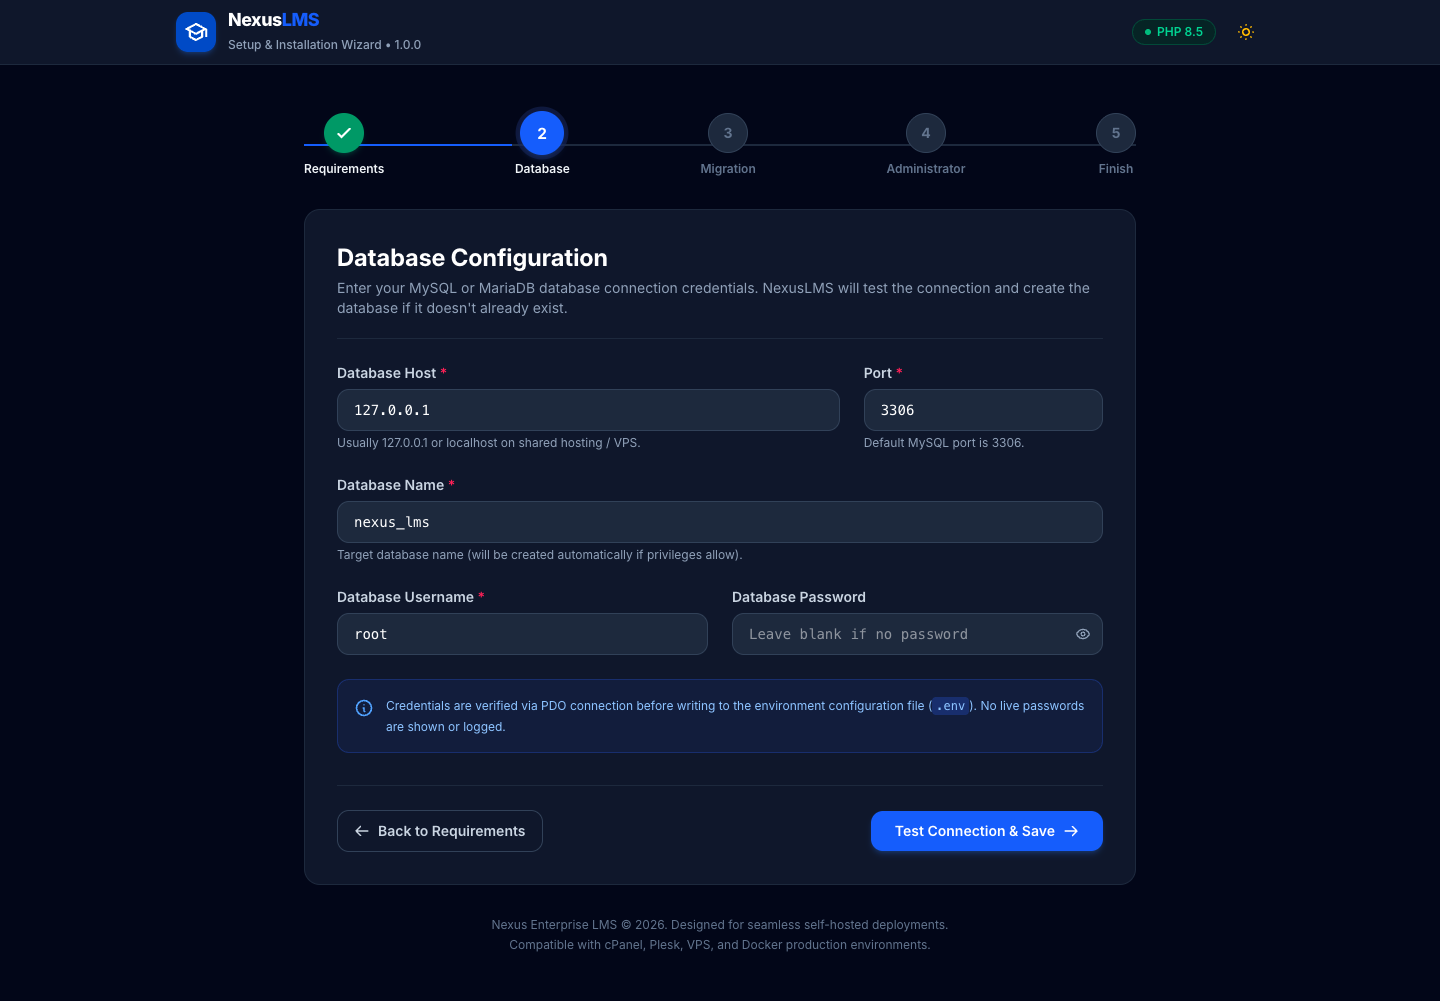
- Database: enter the database host, port, name, user and password. The installer tests the connection and saves it to
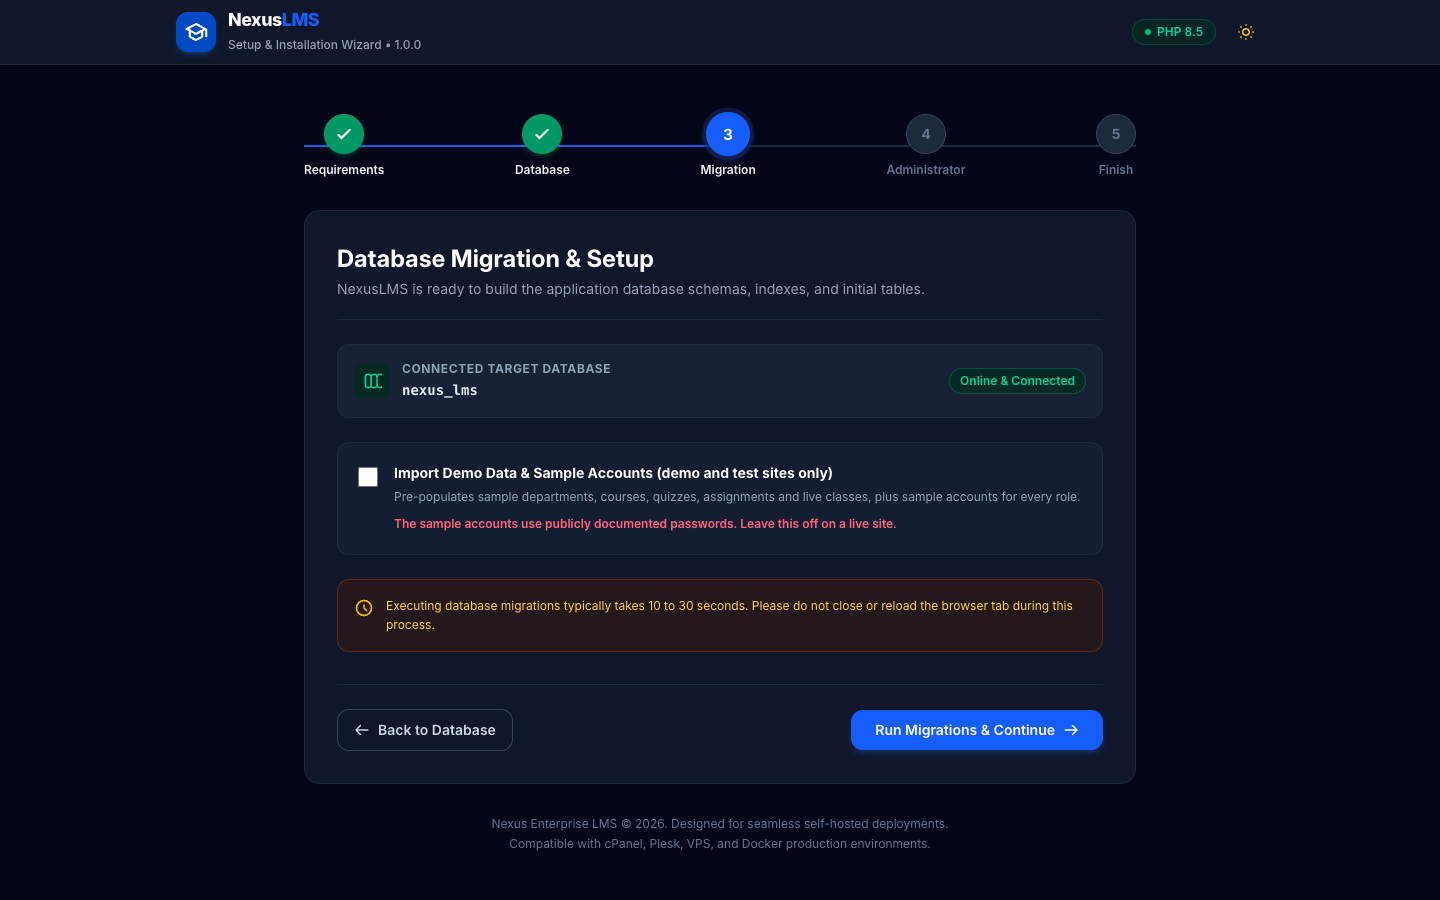
.env. - Migrate: creates the database tables. The Import demo data option adds sample courses, learners and content. Leave it off on a live site: the sample accounts have default passwords that are the same on every installation.
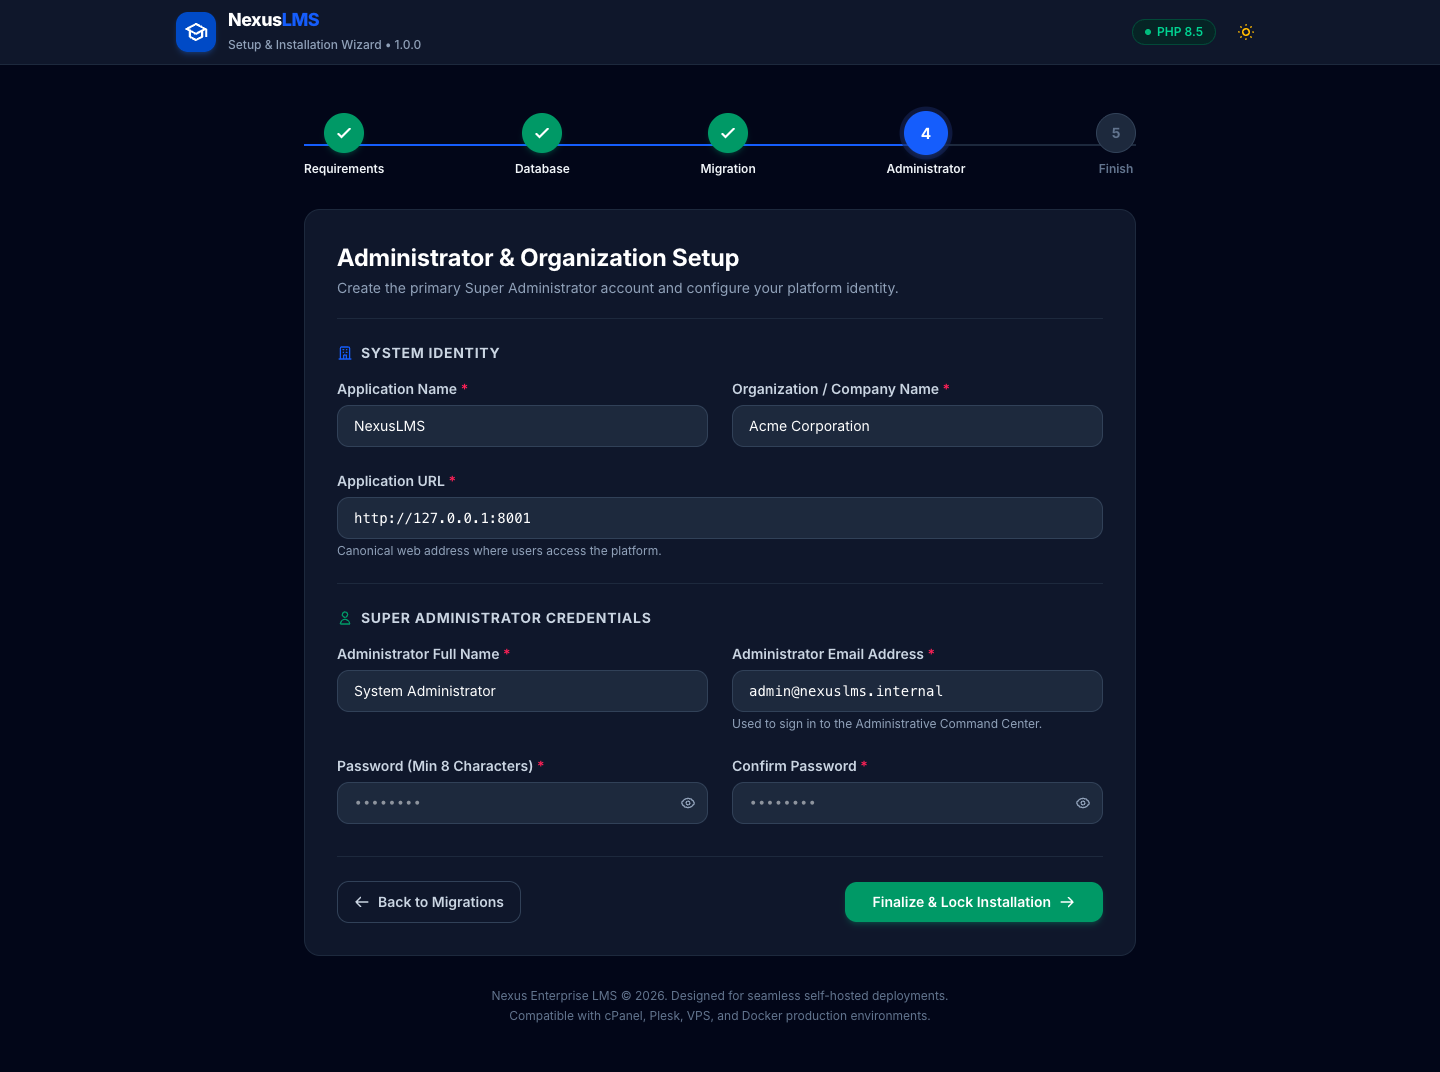
- Administrator: choose the site name, URL and your own administrator name, email and password.
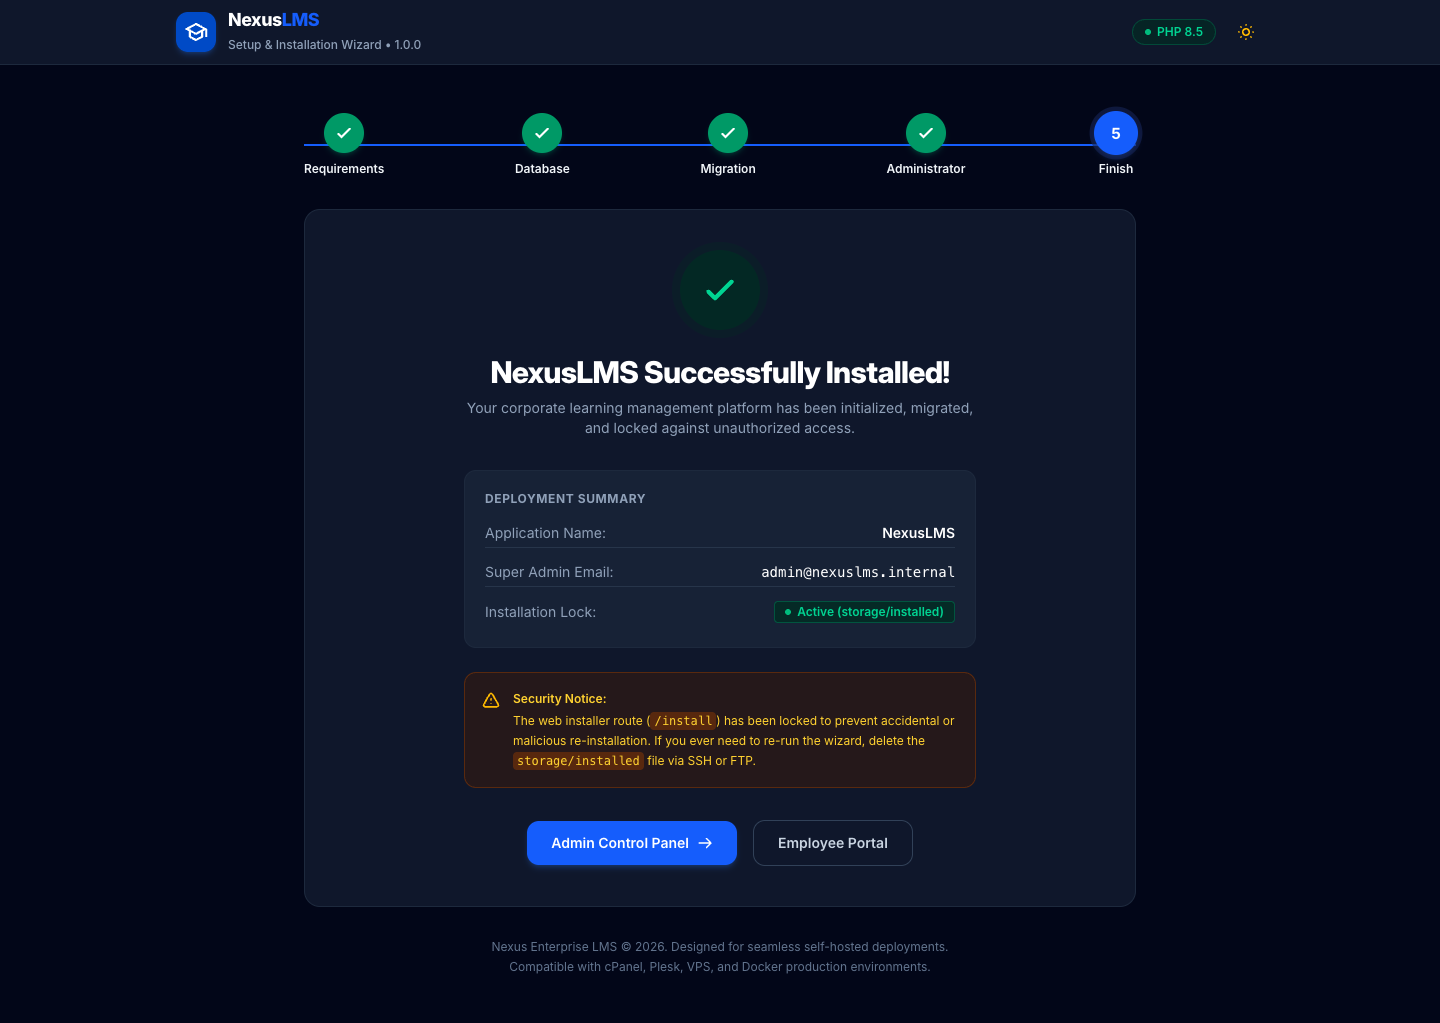
- Finish: the installer switches the site to production mode (
APP_ENV=production,APP_DEBUG=false), links the public storage folder and locks itself. Sign in at/admin.
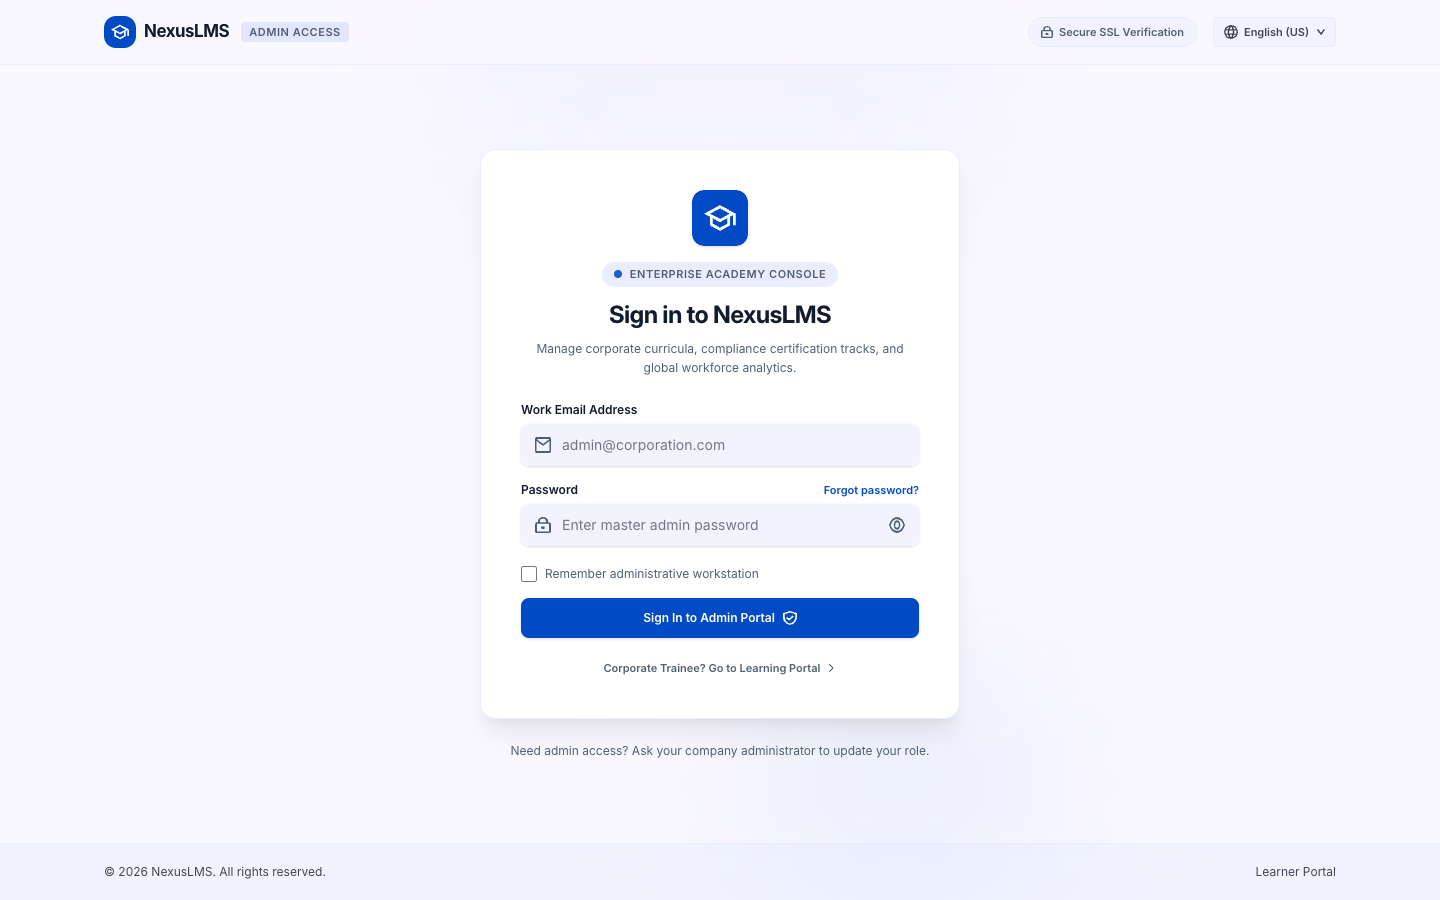
For a public demo site only, set DEMO_MODE=true in .env to show the sample sign-in accounts on the login pages. It is off by default.
Scheduler (cron)
Live class reminders (every 5 minutes), due date and certificate expiry reminders (once a day at 08:00) and the weekly cleanup of replaced assignment files run through the Laravel scheduler. Add this single cron entry on your server:
* * * * * cd /var/www/nexuslms && php artisan schedule:run >> /dev/null 2>&1Everything else works without it. No queue worker is required: push notifications and emails are sent right after each request finishes.
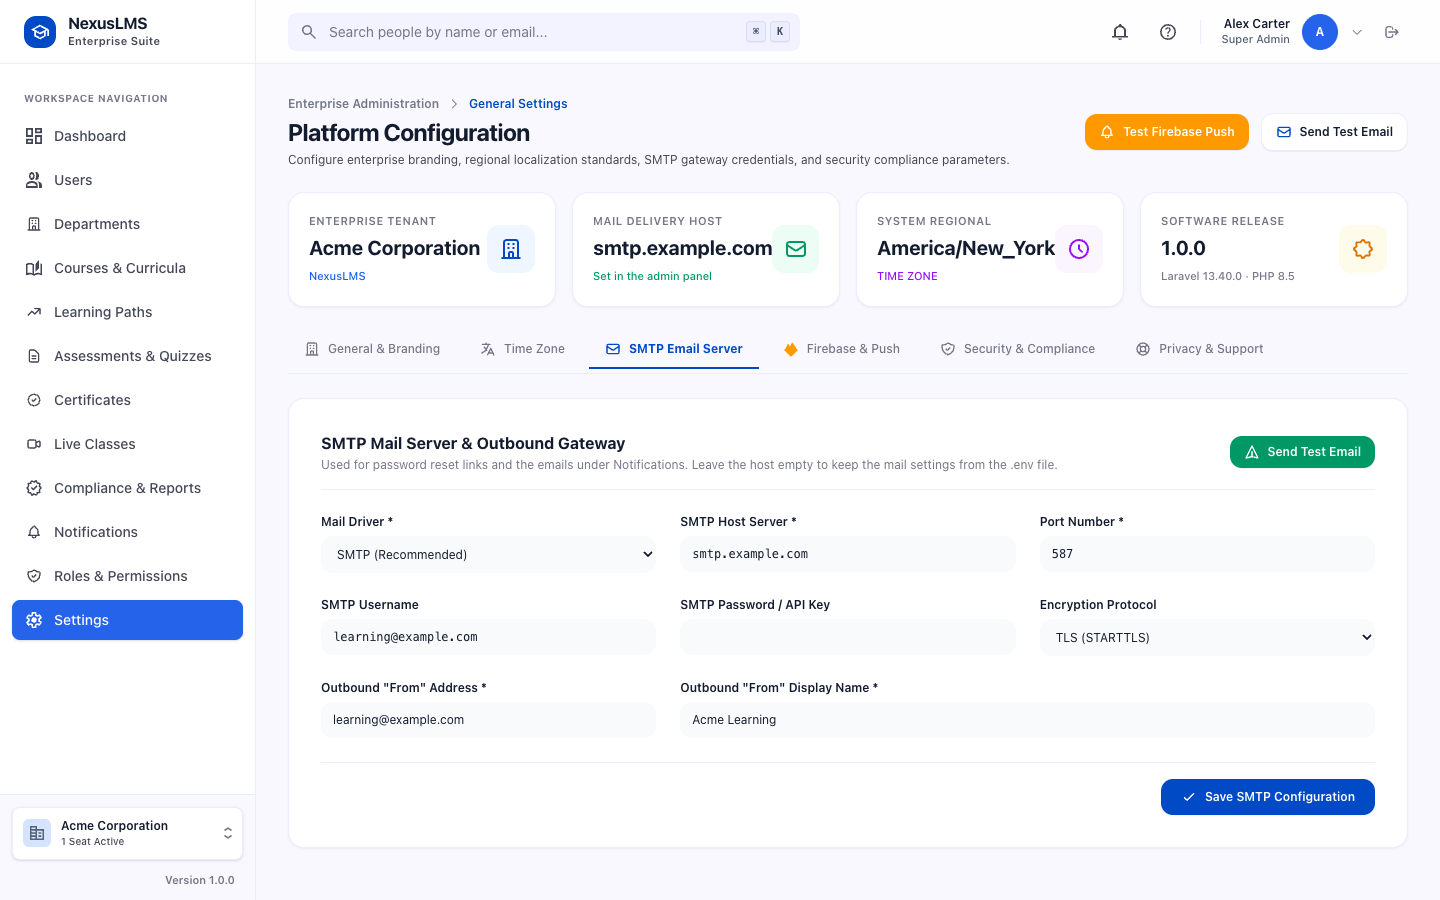
Password reset emails need a working mail server. Set these values in .env (your provider gives you them):
MAIL_MAILER=smtp
MAIL_HOST=smtp.your-provider.com
MAIL_PORT=587
MAIL_USERNAME=your-username
MAIL_PASSWORD=your-password
MAIL_SCHEME=smtp
MAIL_FROM_ADDRESS="learning@your-company.com"
MAIL_SCHEME=smtp uses STARTTLS, usually on port 587. For SSL on port 465, set MAIL_SCHEME=smtps and MAIL_PORT=465.
You can also enter these in Admin → Settings → SMTP Email Server. Values saved there are used instead of the .env values; leave the host empty to keep using .env. Send Test Email sends a real email and shows the mail server's error if it fails.
The reset link opens /portal/reset-password, where learners choose a new password. It works for both the portal and the mobile app.
Local testing and demo mode
To try NexusLMS on your own computer:
cp .env.example .env
composer install
npm install && npm run build
php artisan key:generate
php artisan serve
Create an empty database, open http://127.0.0.1:8000/install and tick Import demo data in step 3 to get sample courses and the demo accounts. The installer switches the site to production mode; for local debugging set APP_DEBUG=true in .env afterwards. Set DEMO_MODE=true to show the demo accounts on the sign-in pages (only for a public demo site).
Going-live checklist
APP_URLis yourhttps://address,APP_ENV=productionandAPP_DEBUG=false(the installer sets these).- Demo data is off, or the demo accounts are deleted or have new passwords;
DEMO_MODEis off. - Email works: send a test from Admin → Settings → SMTP Email Server.
- The cron entry is installed (Scheduler).
- Uploaded images load (run
php artisan storage:linkif not). - Your administrator account uses a strong, unique password.
- Caches are built:
php artisan optimize. - The mobile app's
API_BASE_URLuseshttps://, and release builds are signed (Release builds). - Database and
storagebackups are scheduled.
Updating to a new version
- Back up your database and the
.envfile andstoragefolder. - Upload the new files, keeping your
.envandstoragefolder. - Run:
composer install --no-dev --optimize-autoloader
npm ci && npm run build
php artisan migrate --force
php artisan optimize:clear
Admin panel
Sign in at /admin with the administrator account you created in the installer.
| Section | What you can do |
|---|---|
| Dashboard | See enrollment, completion and activity at a glance. |
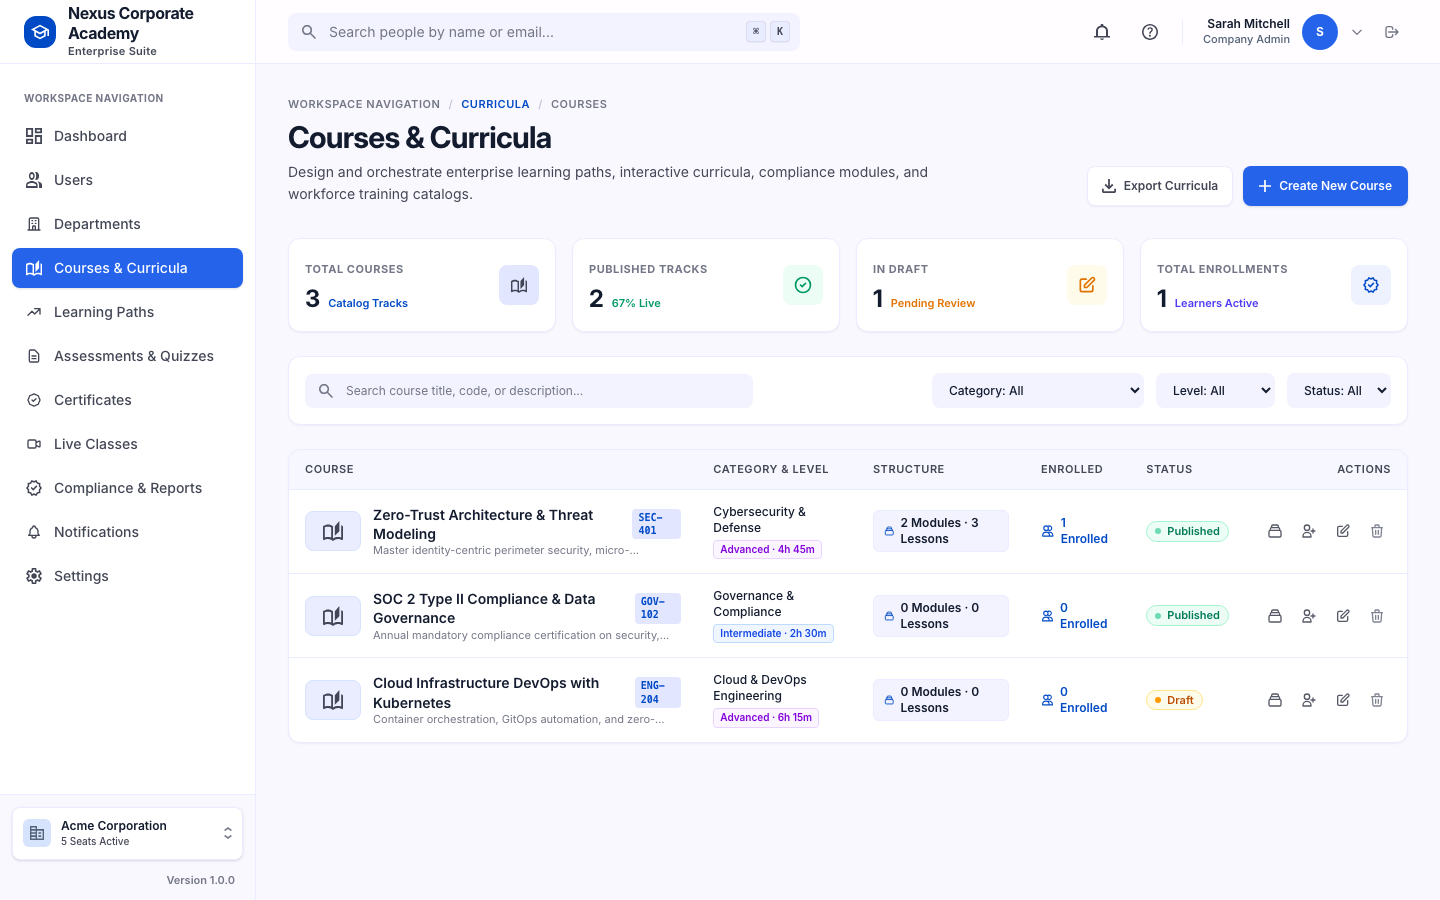
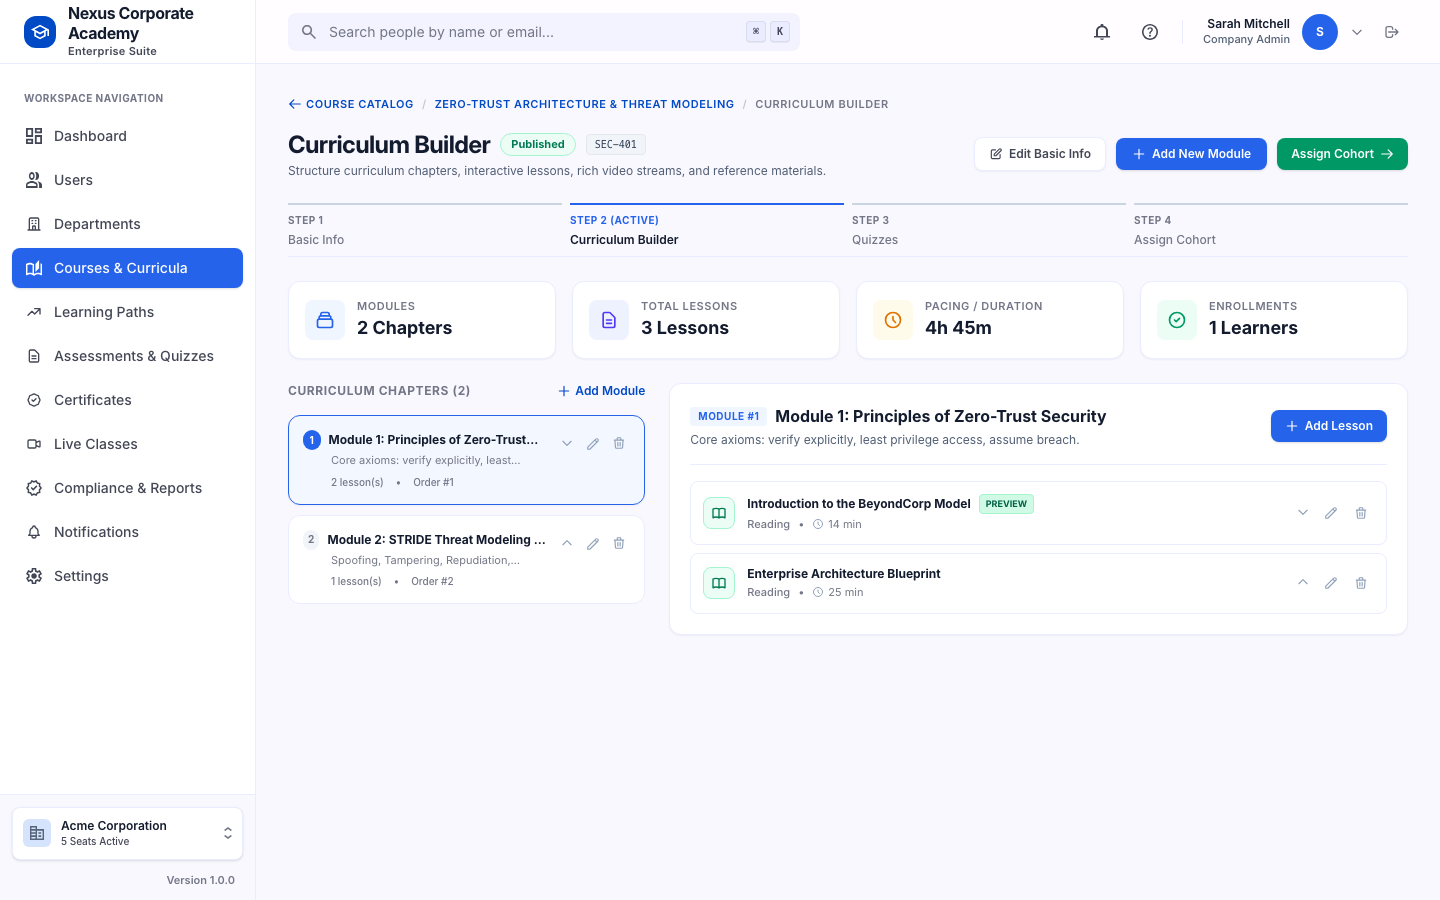
| Courses | Create courses with modules and lessons (video, PDF, formatted text or external links), set completion rules, prerequisite gates, drip schedule and certificate expiry, and publish them. Video uploads (MP4, M4V, WebM, MOV up to 100 MB) or YouTube/Vimeo embeds stream with dynamic learner watermarks; PDF documents open in a secure viewer. |
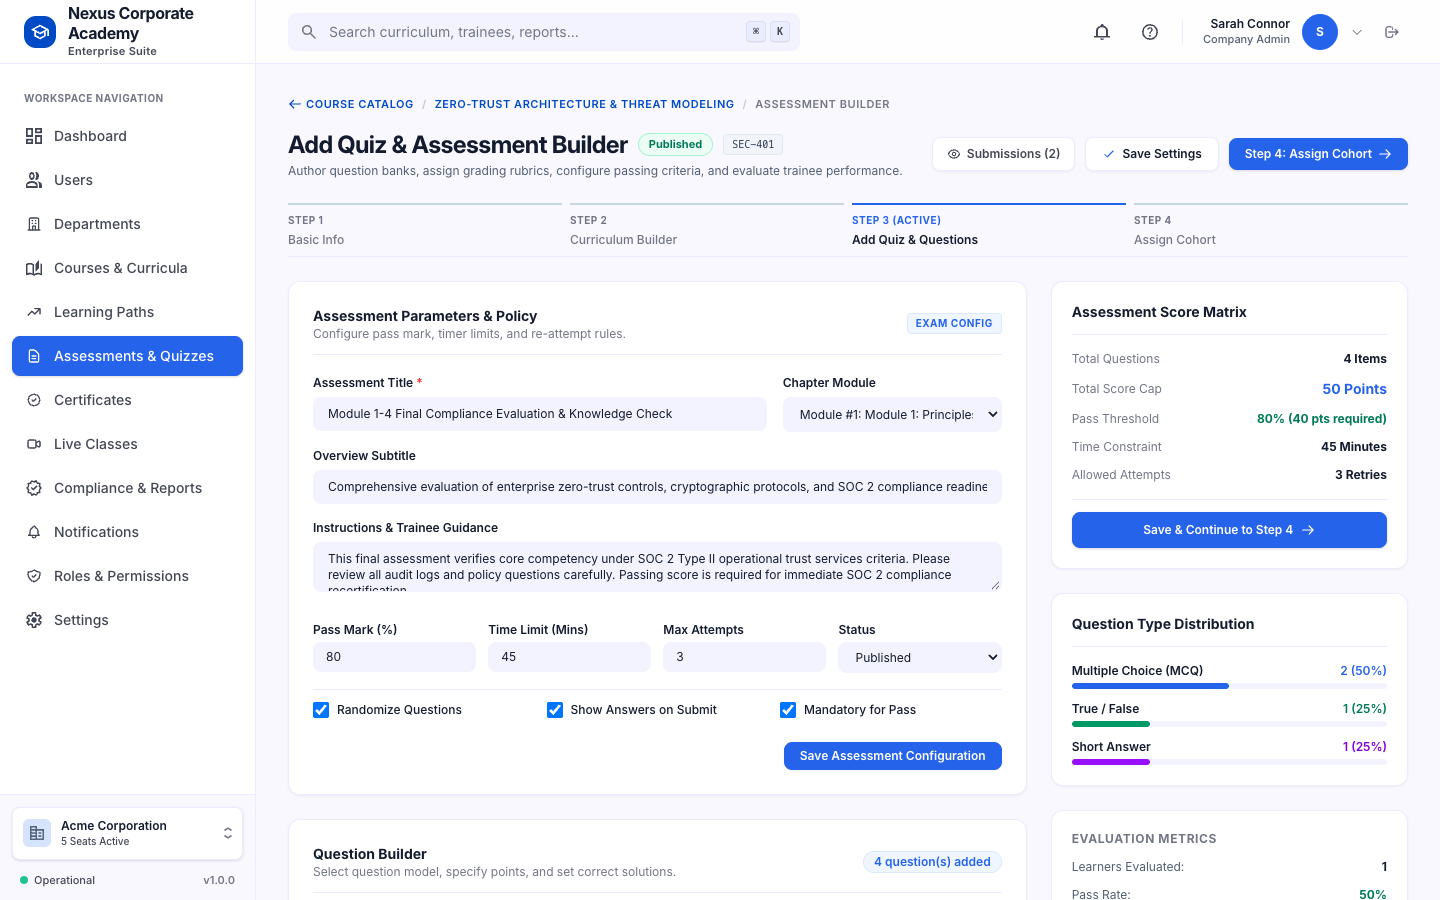
| Quizzes | Build assessments with multiple-choice, true/false and short-answer questions, a time limit, a pass mark and an attempt limit. Short-answer questions are left out of the automatic score until an instructor marks them: open the quiz's attempts, click Needs review, award points and optional feedback. The score and pass result are then recalculated and the learner is notified. |
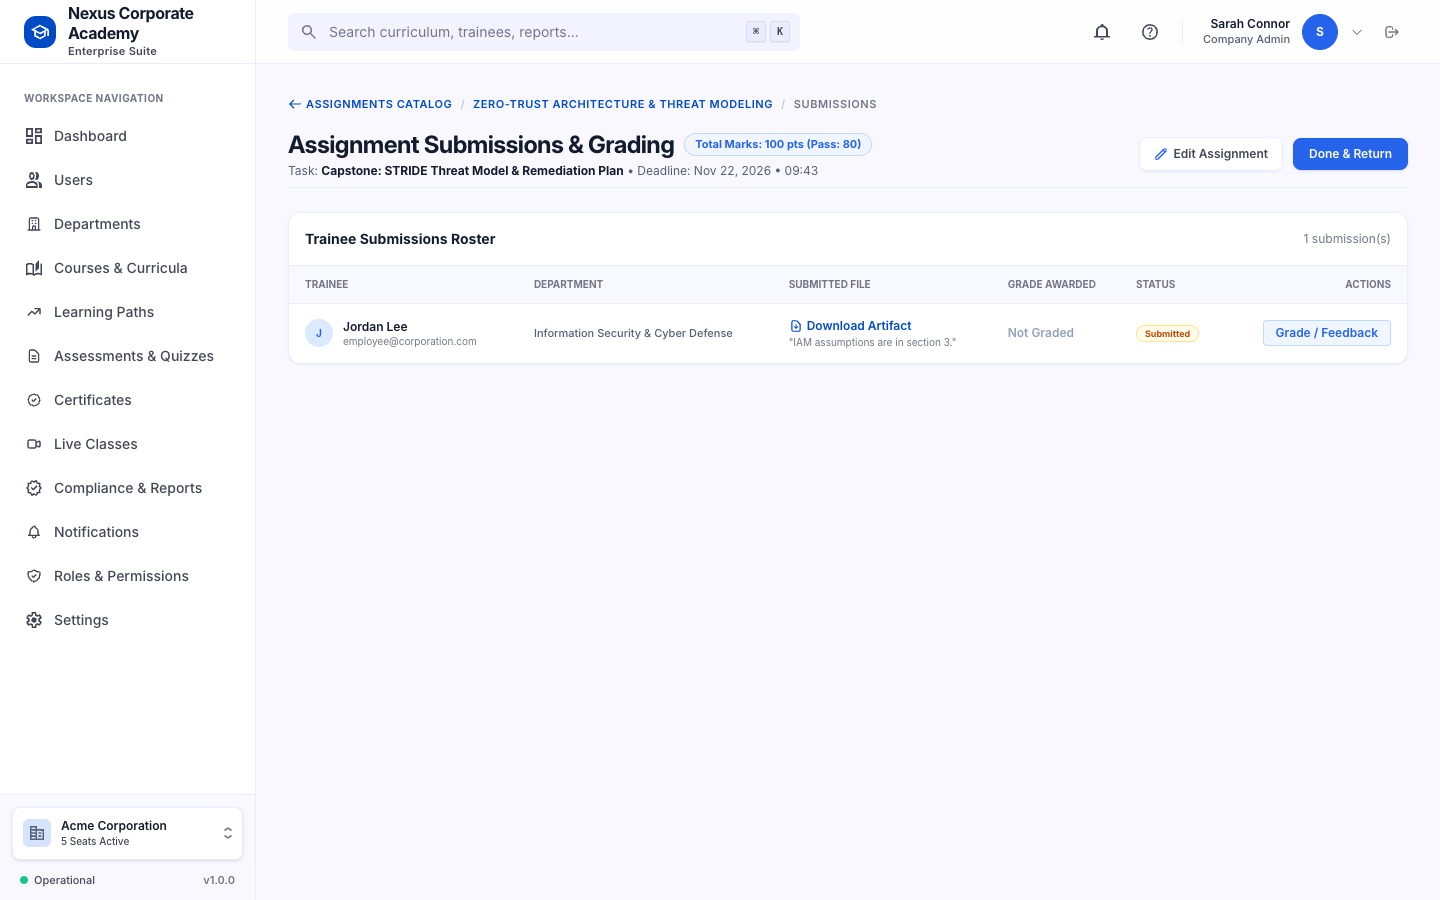
| Assignments | Add assignments to a course with allowed file types, a size limit and a deadline. Review and grade submissions; learners are notified. |
| Learning paths | Group courses into a path and assign it to people or whole departments. |
| Live classes | Schedule sessions with a meeting link (Zoom, Teams, Google Meet). Learners can join from 15 minutes before the start; a reminder is sent automatically. Add the recording link afterwards. |
| Certificates | Issue, revoke and verify certificates and edit certificate templates. |
| Departments and users | Manage departments, employees and their course assignments. |
| Roles | Tick the permissions each role has (for example View users, Grade assignments, Edit settings). Changes apply immediately. You can also create your own roles. Only a Super Admin can open this page. See Who can open what. |
| Notifications | Send announcements to everyone, a department, a course or one person, and edit the emails the platform sends: account welcome, course assigned, course completed, certificate issued, live class invitation and due date reminder. Switch a template off to stop that email. Send Test Email emails the template to you with sample values. |
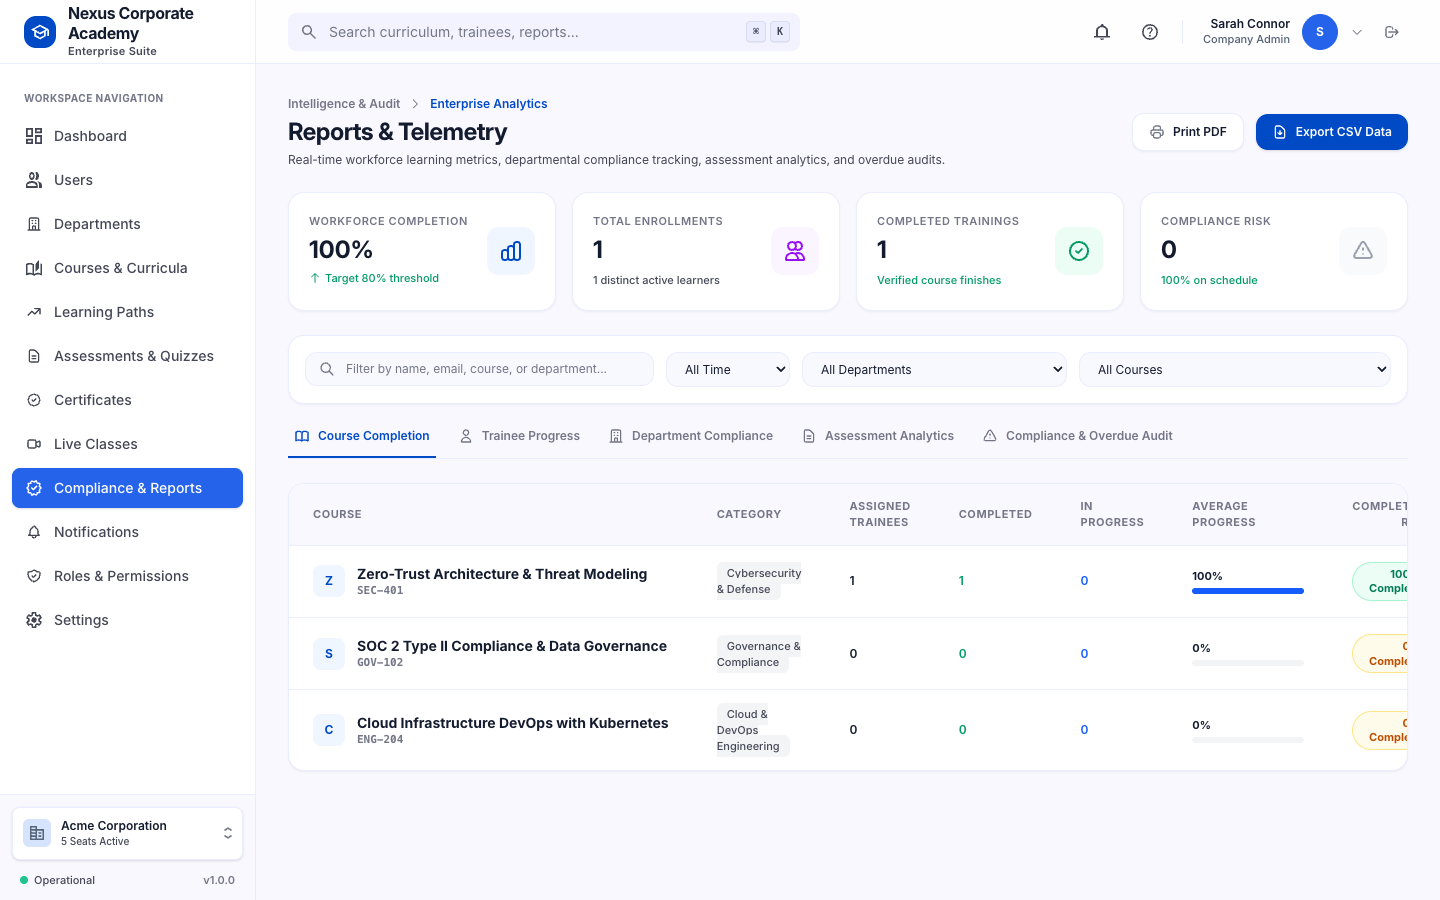
| Reports | Track compliance and course progress, export reports, and send a reminder to a learner with one click. Learners also get automatic reminders 14, 7 and 1 days before a due date, and before a certificate expires. |
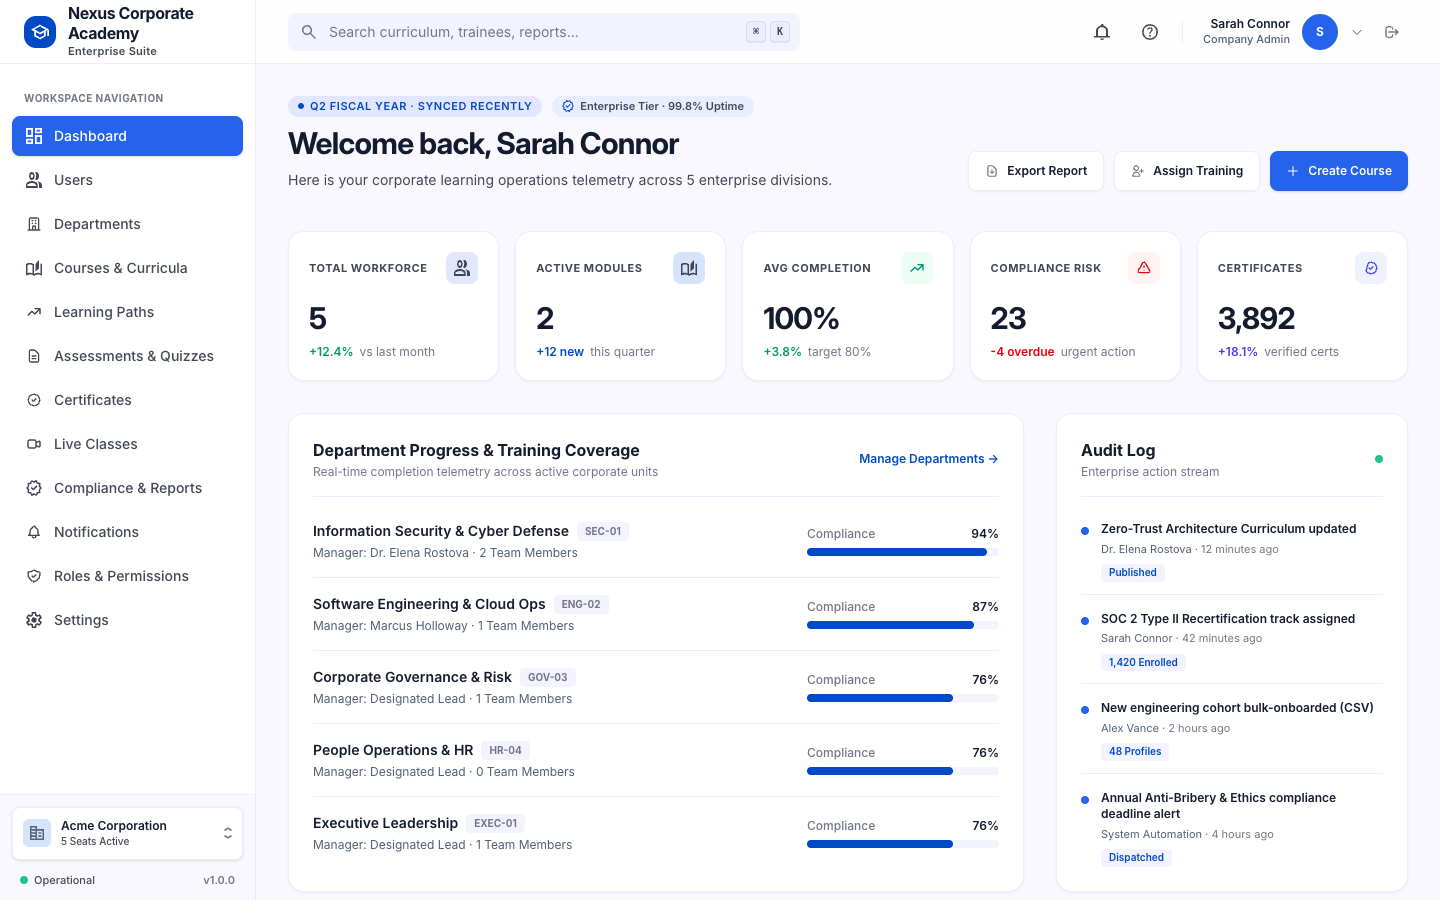
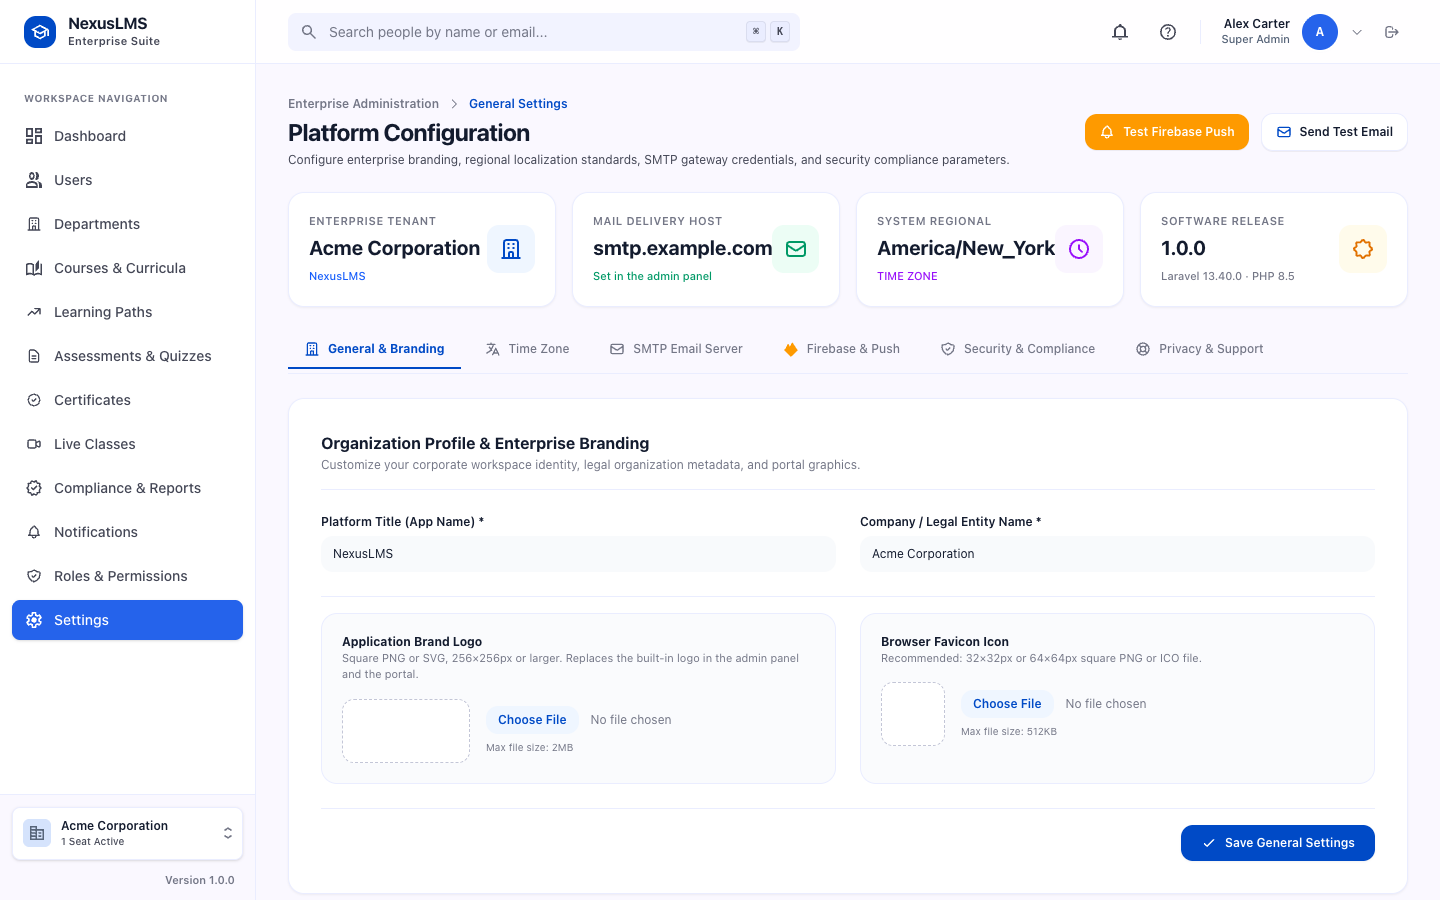
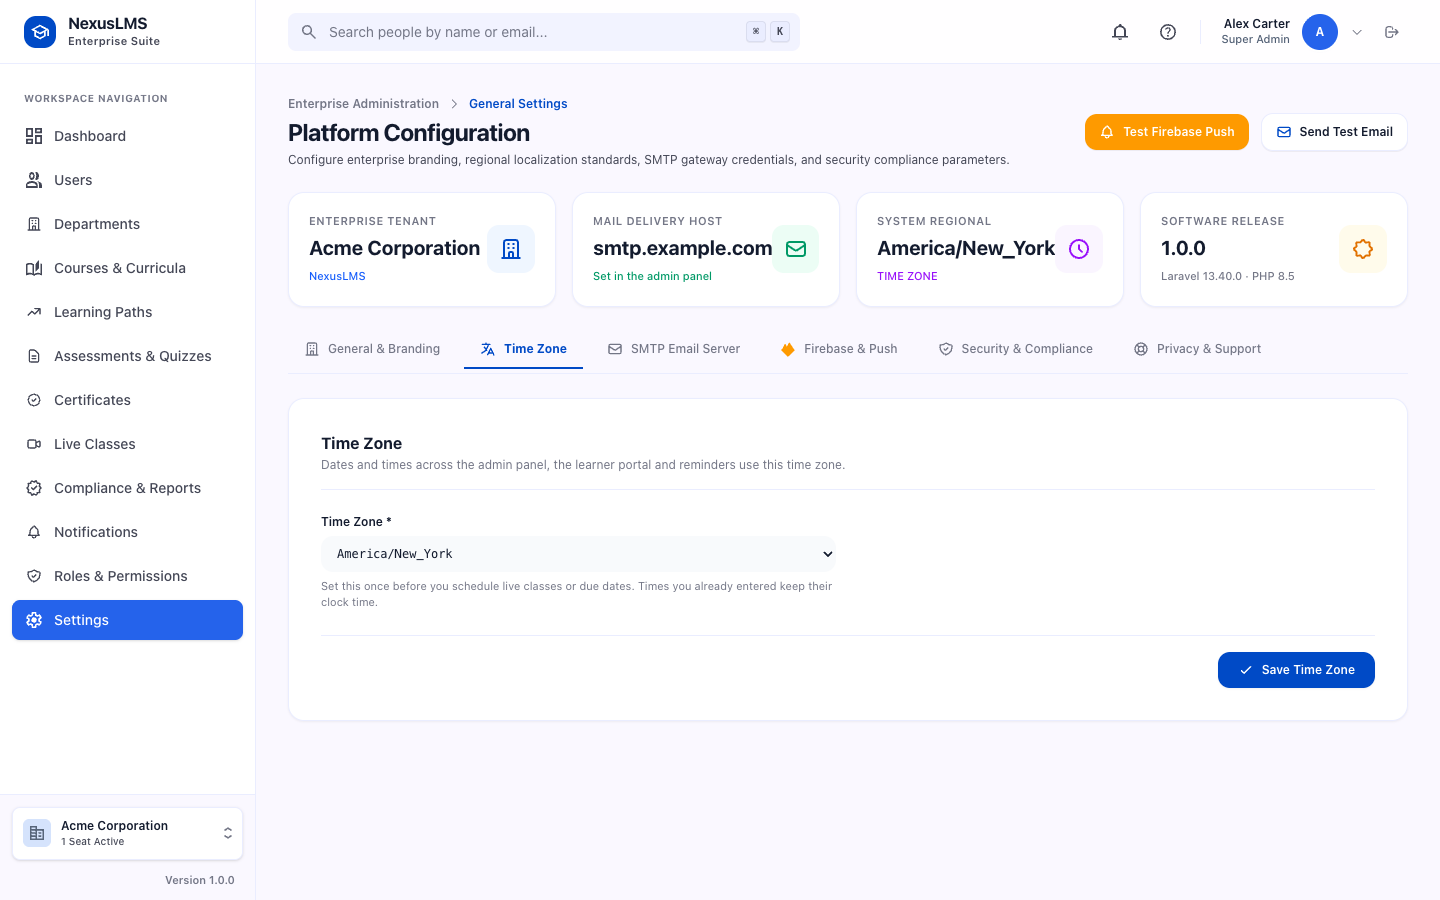
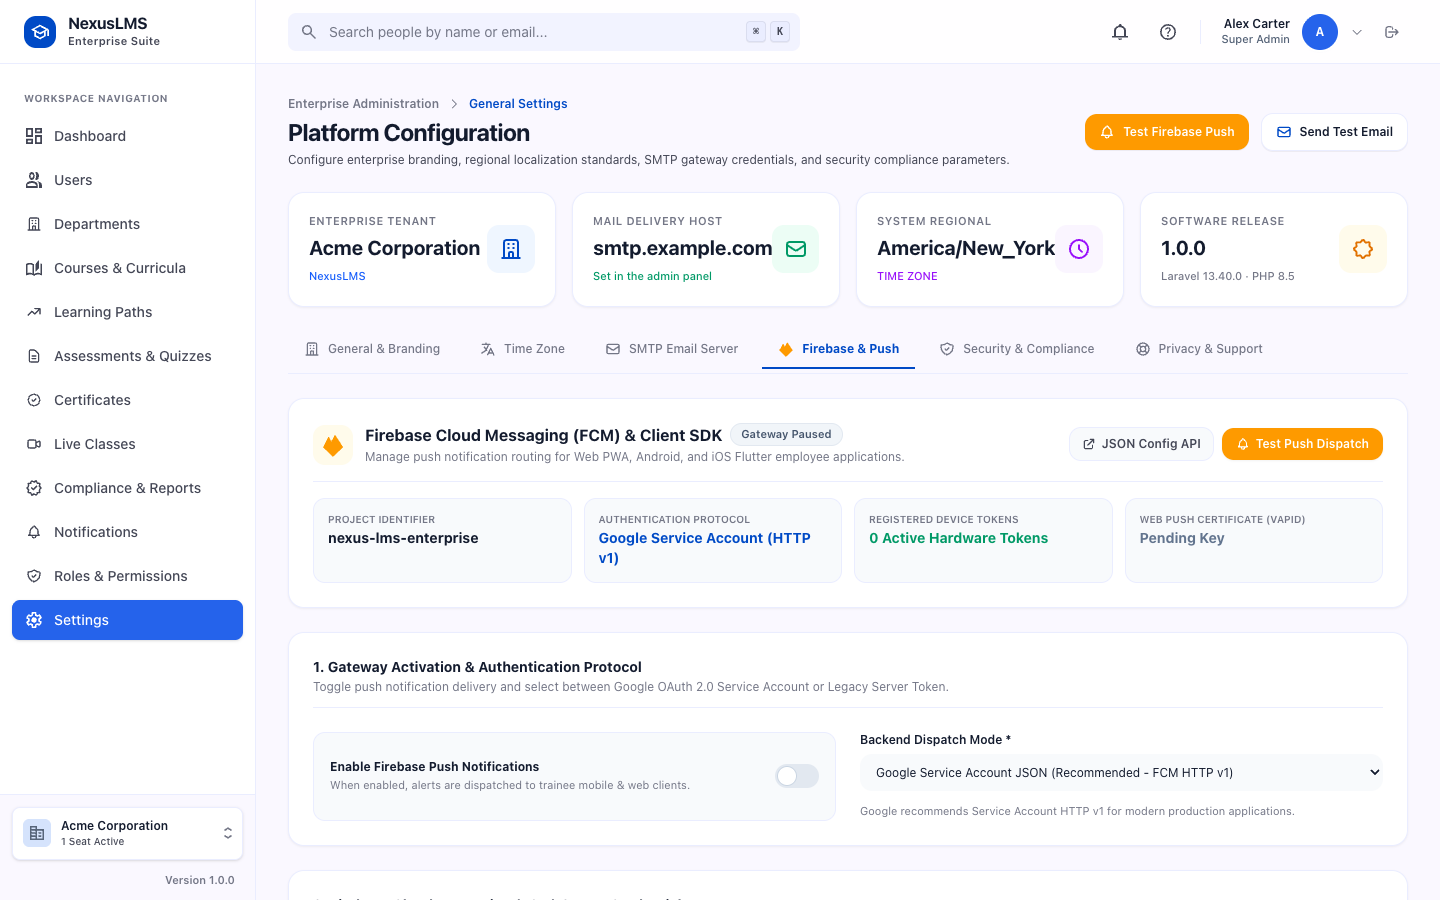
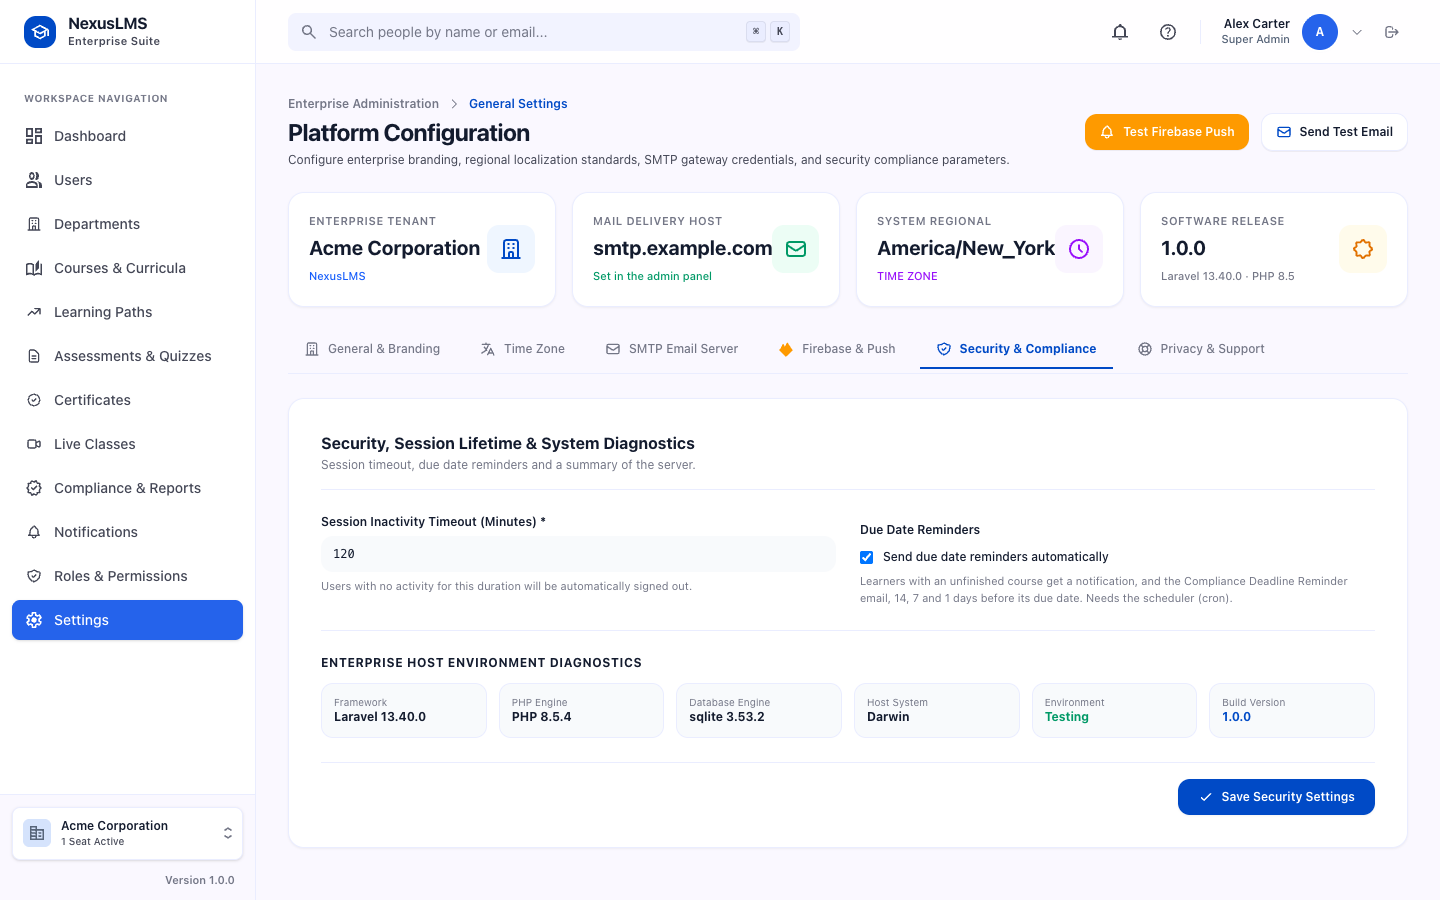
| Settings | Site and company name, logo and favicon, email (SMTP), Firebase push, time zone, session timeout and due date reminders, and the privacy policy and help desk details. |
Settings
Open Admin → Settings to set up the platform. Each tab is shown below.
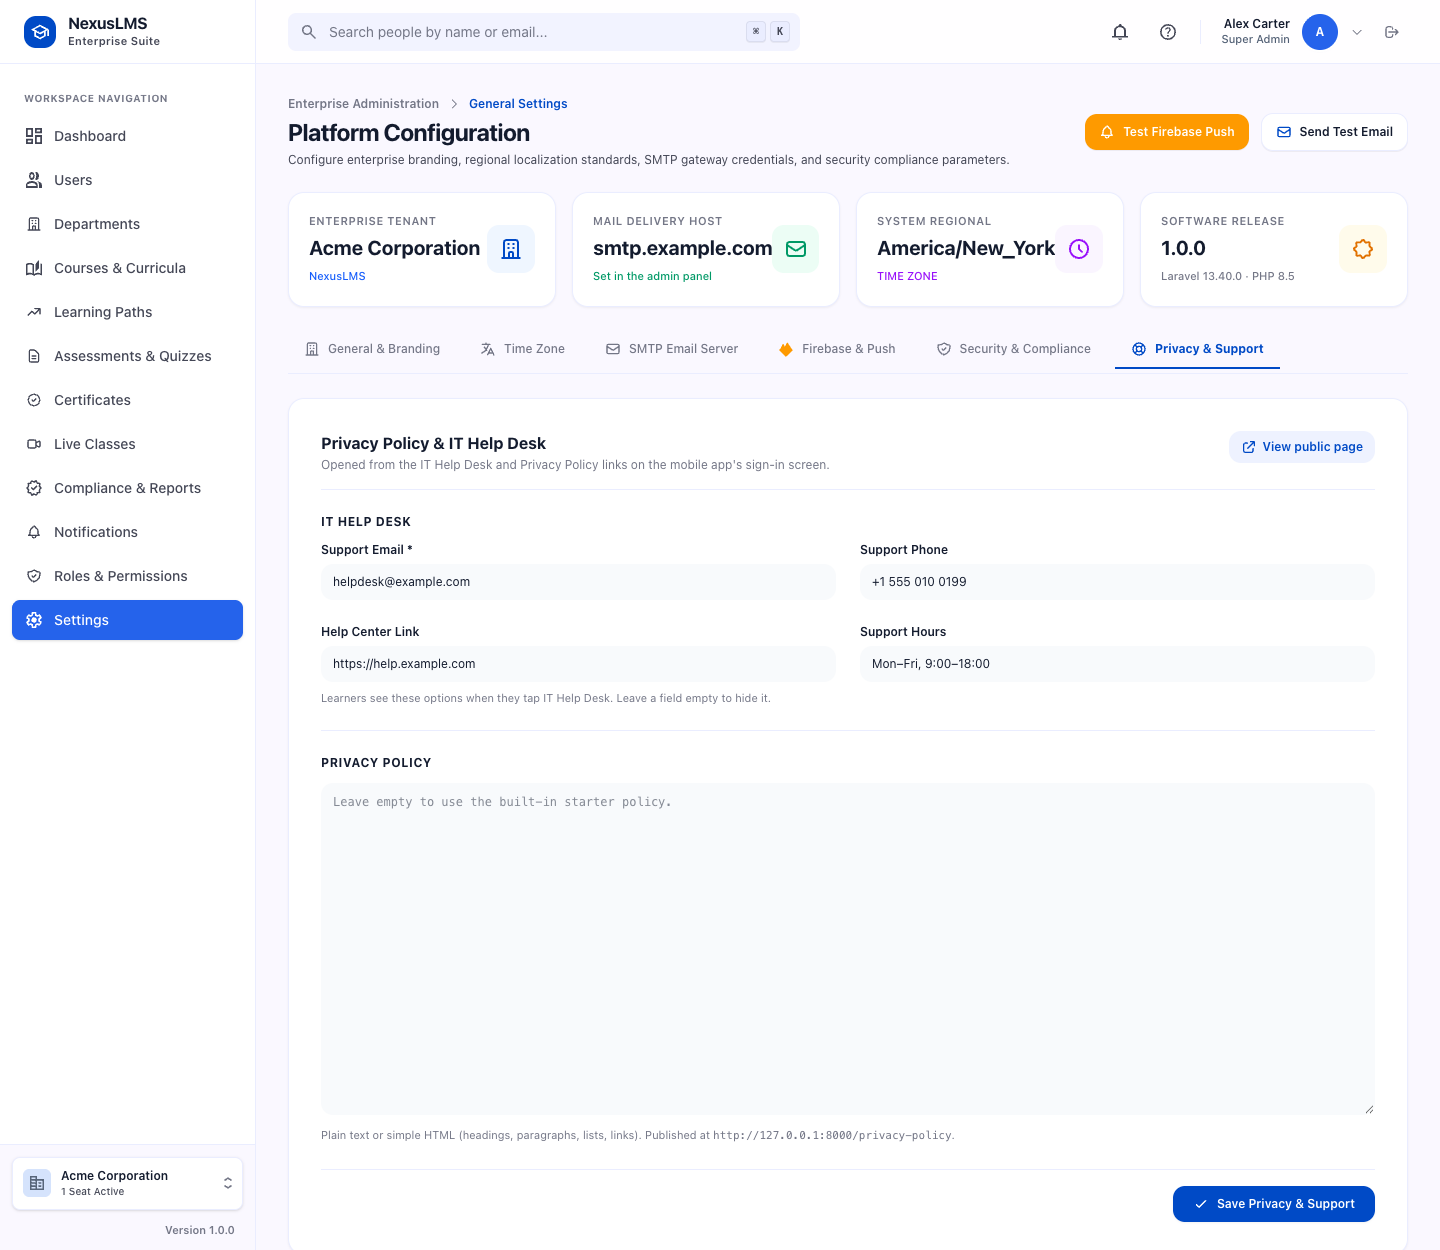
Privacy & Support holds the IT Help Desk details (email, phone, help center link and support hours) and your privacy policy. In the mobile app, IT Help Desk on the sign-in screen lists the contacts you fill in, and Privacy Policy opens the policy inside the app. The policy is also published at https://your-domain.com/privacy-policy, which you can use as the privacy policy link in the App Store and Google Play. Until you write your own, a starter policy is shown; it fills in your company name automatically. You can paste plain text or simple HTML (headings, paragraphs, lists and links).
Who can open what
Each admin page needs a permission, and each role holds a set of permissions that you can change under Admin → Roles & Permissions. A Super Admin always has every permission. The defaults are:
| Role | Default access |
|---|---|
| Super Admin | Everything, including Roles & Permissions. |
| Company Admin | Everything except Roles & Permissions. Cannot create, edit or delete Super Admin accounts. |
| Manager | View users, manage departments, view courses and assign them, learning paths, view certificates and live classes, reports (view, export, reminders) and announcements. |
| Instructor | Create and edit courses, quizzes (including short-answer review), grade assignments, host live classes and take attendance, view reports. |
| Employee | The learner portal and mobile app only, and only the courses they are enrolled in (or courses that allow self-enrollment). |
A role you create yourself can open the admin panel as soon as it has at least one permission. Giving permissions to the Employee role lets every learner into the admin panel, so leave it empty.
Lesson files and assignment submissions are stored privately in storage/app/private. Learners reach them only through authenticated stream and download routes that verify active course enrollment on every request.
First-time setup
- Settings → General & Branding: site and company name, logo and favicon.
- Settings → Time Zone: choose your time zone before you schedule live classes or set due dates.
- Settings → SMTP Email Server: mail settings, then send a test email.
- Departments, then Users: add people one by one or import a CSV file (download the sample from the Users page). Each imported person is emailed a link to choose their own password, so set up email first; anyone who misses it can use Forgot password on the sign-in page.
- Courses: create a course, add modules and lessons, add quizzes and assignments, publish it and assign it to departments or people.
Demo credentials
Demo accounts exist only if you tick Import demo data in the installer. The administrator you create in the installer is separate and uses your own password.
| Account | Signs in at | |
|---|---|---|
| Super Admin | /admin | admin@nexuslms.internal |
| Company Admin | /admin | admin@corporation.com |
| Manager | /admin | manager@corporation.com |
| Instructor | /admin | instructor@corporation.com |
| Learner | /portal and the app | employee@corporation.com |
To try them, set DEMO_MODE=true in .env: the admin sign-in page then offers the Super Admin and Company Admin accounts, and the portal sign-in page the Learner account, with their passwords filled in. The Manager and Instructor accounts use the same password as the Learner.
DEMO_MODE off and delete the demo accounts or give them new passwords under Admin → Users.White-labeling
- Name, logo and favicon: Admin → Settings → General & Branding. An uploaded logo (square works best) replaces the built-in one in the admin panel, the portal and the sign-in pages. The built-in logo is
public/assets/images/brand/logo.svg(see Icon, colors and font). - Emails: edit the subject and text of each automatic email under Admin → Notifications.
- Certificates: logo, signature and wording under Admin → Certificates → Template Designer & Settings.
- Time zone: Settings → Time Zone.
- Mobile app: name, package, icon, colors and font are set in the app's source; see Rename the app and package and Icon, colors and font.
Learner portal
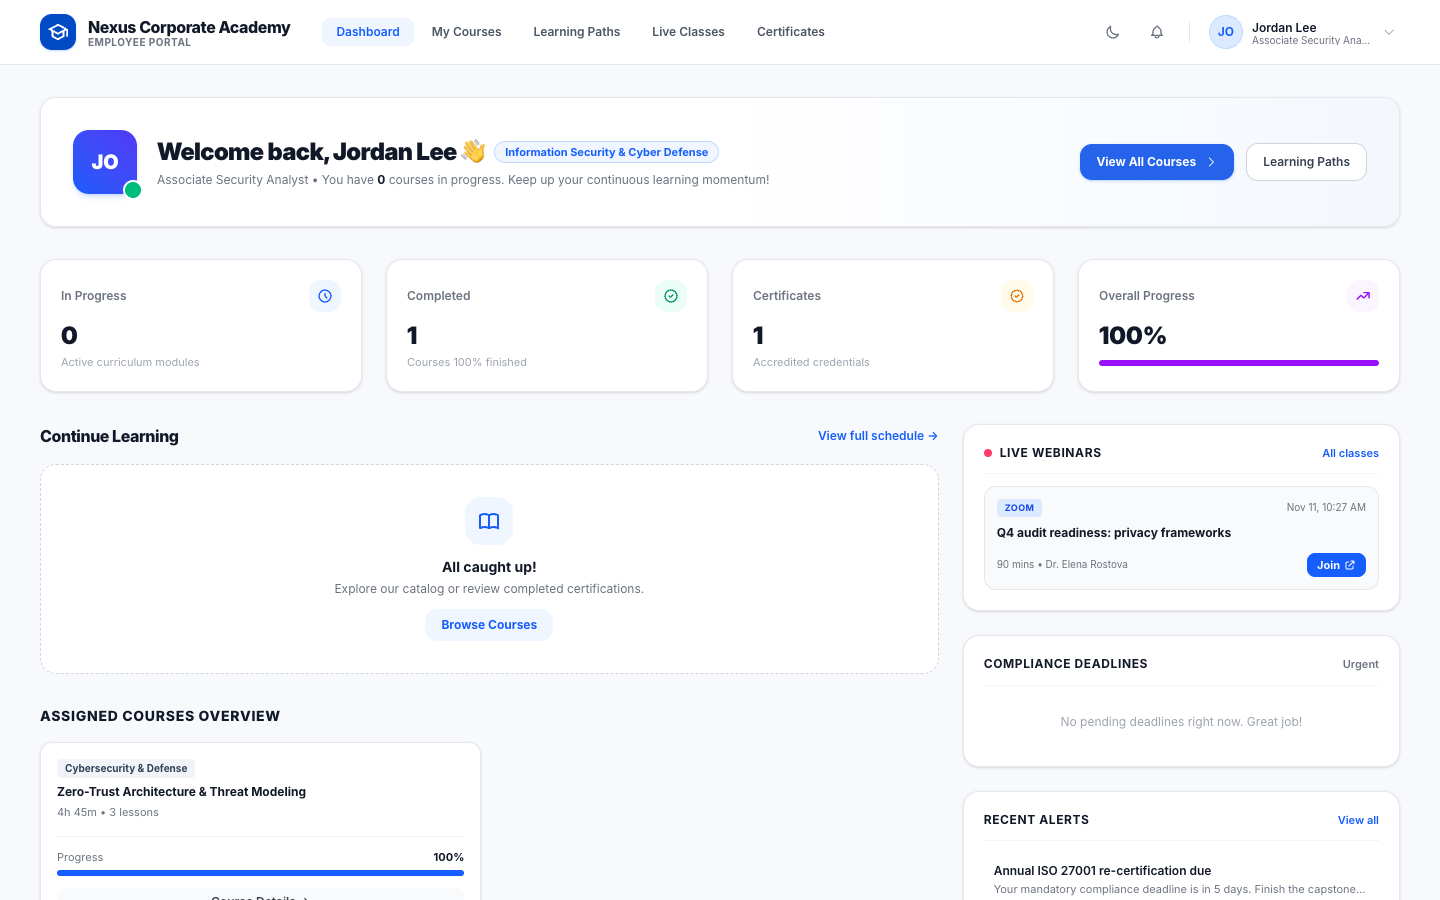
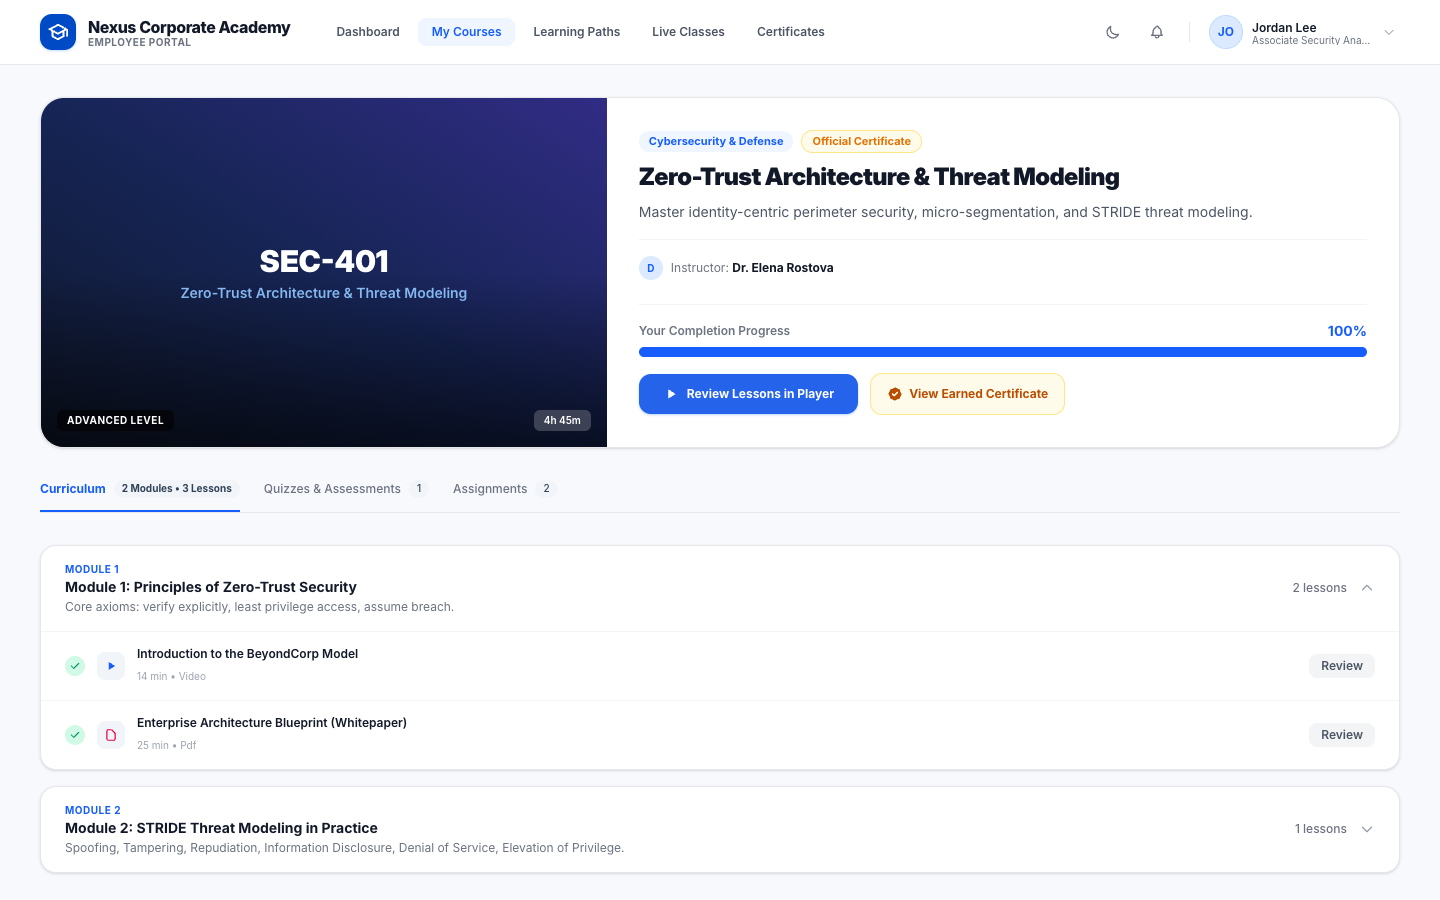
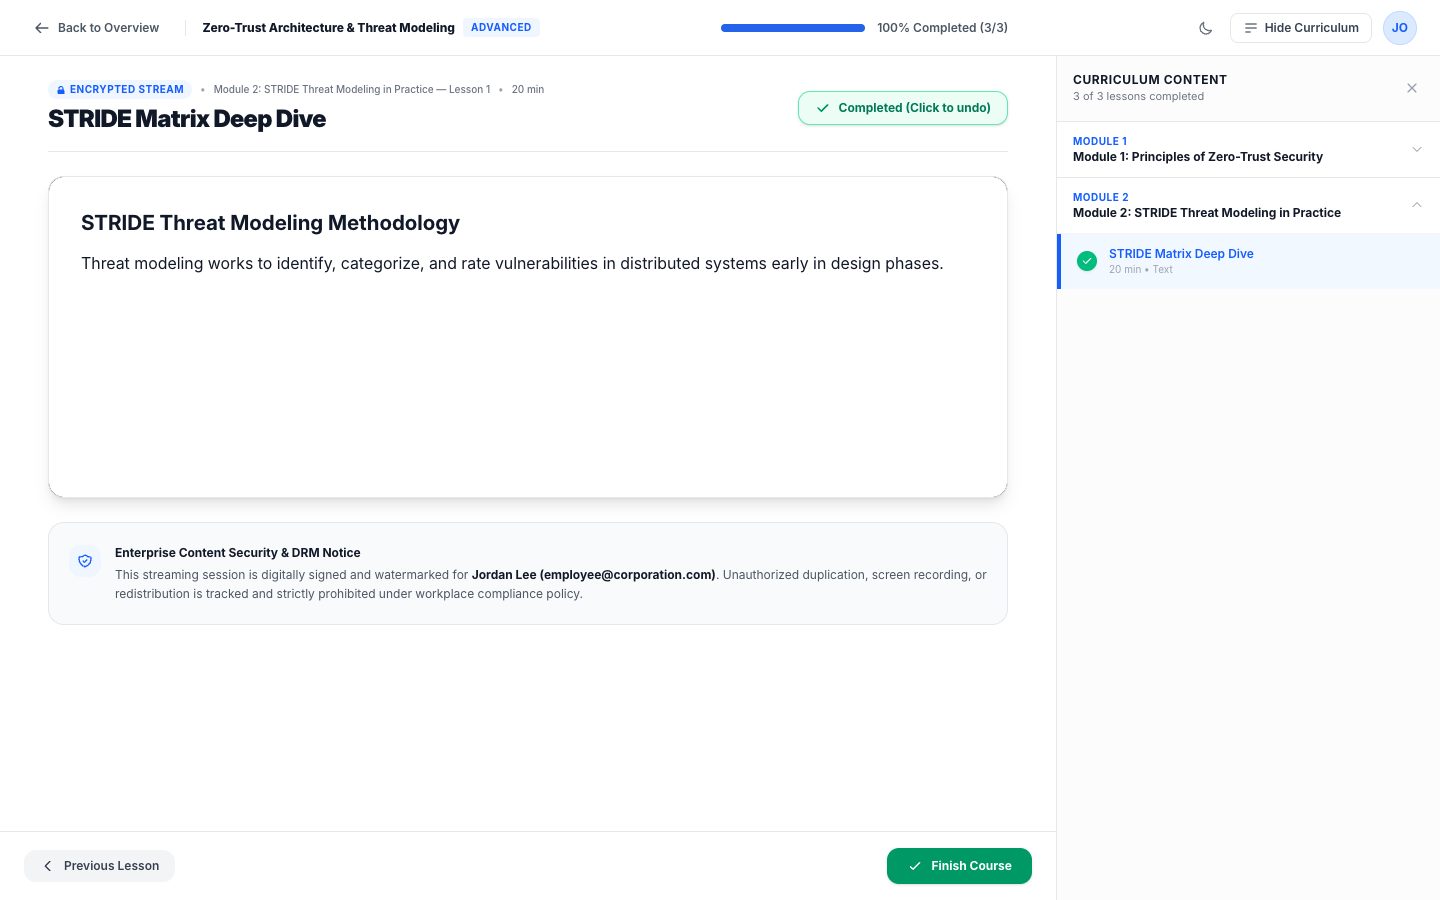
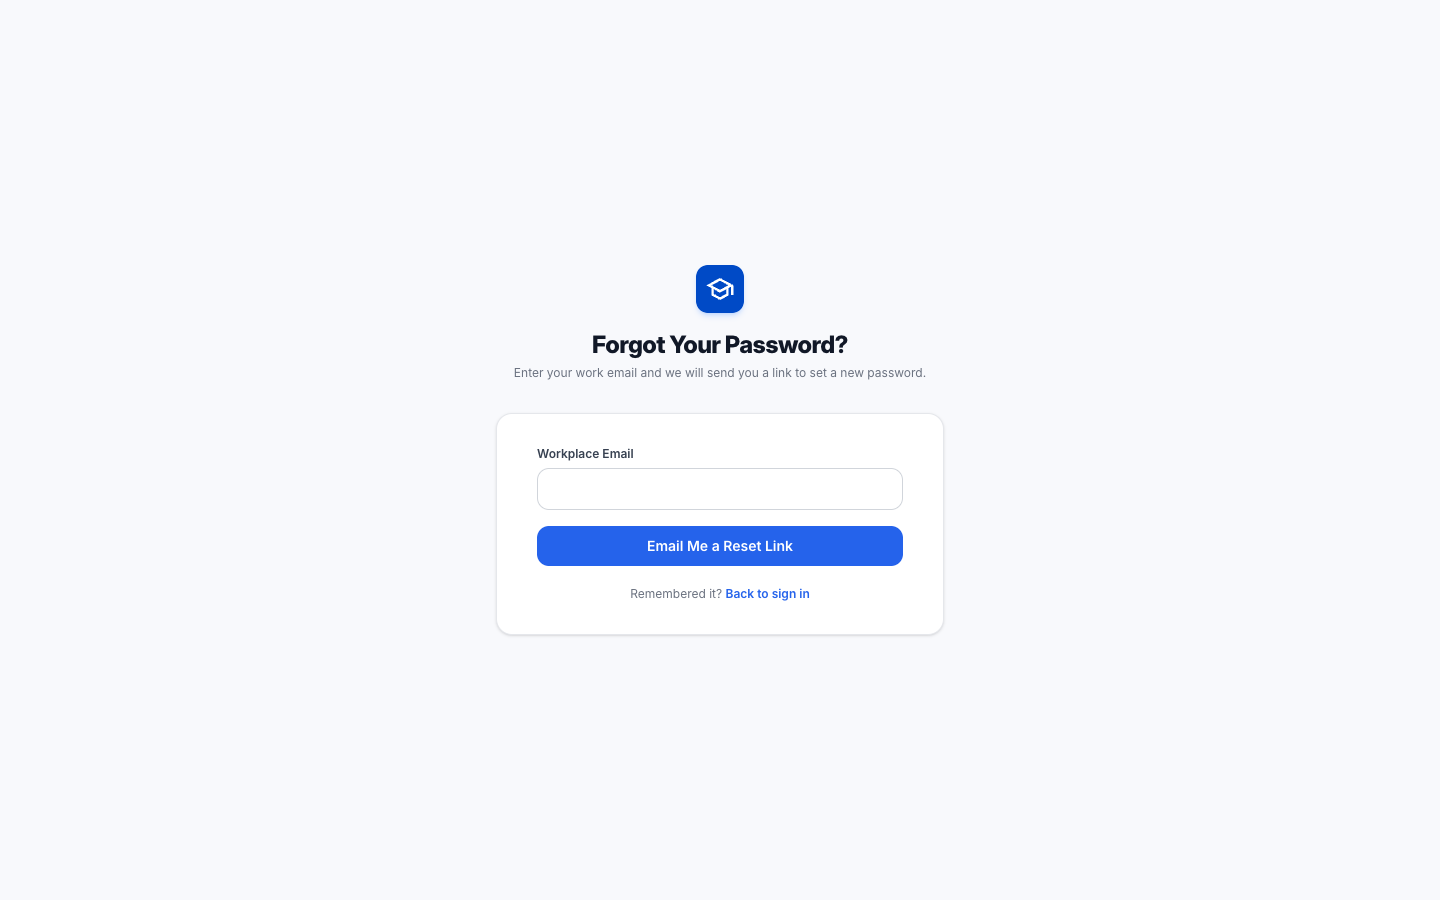
Employees sign in at /portal to see their assigned courses, continue lessons, take quizzes, submit assignments, join live classes, and view and print certificates. The site root (/) opens the portal.
Architecture
| Path | Purpose |
|---|---|
app/Http/Controllers/Admin | Admin panel pages. |
app/Http/Controllers/Portal | Learner web portal. |
app/Http/Controllers/Api/V1 | REST API used by the mobile app. |
app/Http/Controllers/InstallController.php, app/Services/InstallService.php | Web installer. |
app/Http/Middleware | Admin access, the permission each admin page needs (AdminPermission), and the installer lock. |
app/Models | Database models. |
app/Services | Course progress, notifications and push (LearnerNotifier, FirebaseService), short-answer review (QuizAttemptReviewer) and safe lesson text (RichText). |
app/Console/Commands | Live class reminders, due date and certificate expiry reminders, and cleanup of replaced assignment files. |
database/migrations, database/seeders | Tables, default roles, permissions and email templates; demo data. |
resources/views/admin, portal, install | Blade templates. |
routes/web.php, routes/api.php, routes/console.php | Web pages, API and scheduled tasks. |
storage/app/private | Lesson files and assignment submissions (not publicly reachable). |
Key design decisions
- One
userstable for admins and learners; what each person can do comes from their role and its permissions (spatie/laravel-permission). A Super Admin always has every permission. - Every admin page is mapped to a permission in one place, and a test fails if a new page is added without one.
- Learners only reach courses, lessons, quizzes, assignments and live classes they are enrolled in or invited to; the API and the portal share the same checks.
- Lesson files and submissions are stored privately; media stream and download endpoints verify authentication and active enrollment on every request.
- The mobile app signs in with Laravel Sanctum tokens.
- Push notifications and emails are sent right after each request finishes, so no queue worker is needed.
- Lesson text written by admins is cleaned before it is shown, so scripts cannot run.
API
The mobile app uses the API at https://your-domain.com/api/v1. Learners sign in with POST /api/v1/auth/login and receive a bearer token, which is sent as Authorization: Bearer <token> on every other request. Sign-in and password reset requests are rate limited.
Signed-in requests are limited to 120 per minute; sign-in to 5 attempts per minute.
| Area | Endpoints (all under /api/v1/) |
|---|---|
| Sign-in and account | POST auth/login, auth/logout, auth/forgot-password, auth/reset-password, GET auth/me |
| Home | GET dashboard, GET system/config |
| Courses and lessons | GET courses, courses/{slug}, courses/{slug}/lessons/{id}, …/stream, POST …/complete |
| Learning paths | GET learning-paths, learning-paths/{slug} |
| Quizzes | GET quizzes/{id}, POST quizzes/{id}/start, quizzes/{id}/submit, GET quizzes/{id}/attempts/{attempt} |
| Assignments | GET assignments, assignments/{id}, POST assignments/{id}/submit (file upload) |
| Live classes | GET live-classes, POST live-classes/{id}/join |
| Certificates | GET certificates, certificates/{number} |
| Notifications | GET notifications, POST notifications/{id}/read, notifications/read-all, POST device-token |
| Profile | GET profile, POST profile (photo), POST profile/change-password |
Tests
The backend has 320 automated tests. They run on an in-memory SQLite database, so no MySQL is needed (PHP's pdo_sqlite extension must be enabled):
php artisan testThey cover the installer, sign-in and password reset, roles and permissions, enrollment checks, courses and lessons, quizzes and short-answer review, assignments, live classes, certificates, notifications and push, and the API.
The mobile app has 189 tests, including an architecture test that keeps the code layered:
flutter analyze
flutter testMobile app: setup and running
- Open
main/mobilein Android Studio or VS Code. - Create your settings file from the example and set your API address:
cp assets/.env.example assets/.env
IfAPI_BASE_URL=https://your-domain.com/api/v1assets/.envis missing, the app uses the values inassets/.env.example. To try the app before your server is ready, setAPI_BASE_URL=https://nexuslms.dev-shamim.com/api/v1and sign in with the demo learner account from the item description.Set
API_BASE_URLto your server's address followed by/api/v1:- Live server:
https://your-domain.com/api/v1(use HTTPS; Android blocks plain HTTP in release builds). - Android emulator with a server on your computer:
http://10.0.2.2:8000/api/v1. - iOS simulator with a server on your computer:
http://127.0.0.1:8000/api/v1.
After changing it, stop the app and run it again; a hot reload does not pick up
.envchanges.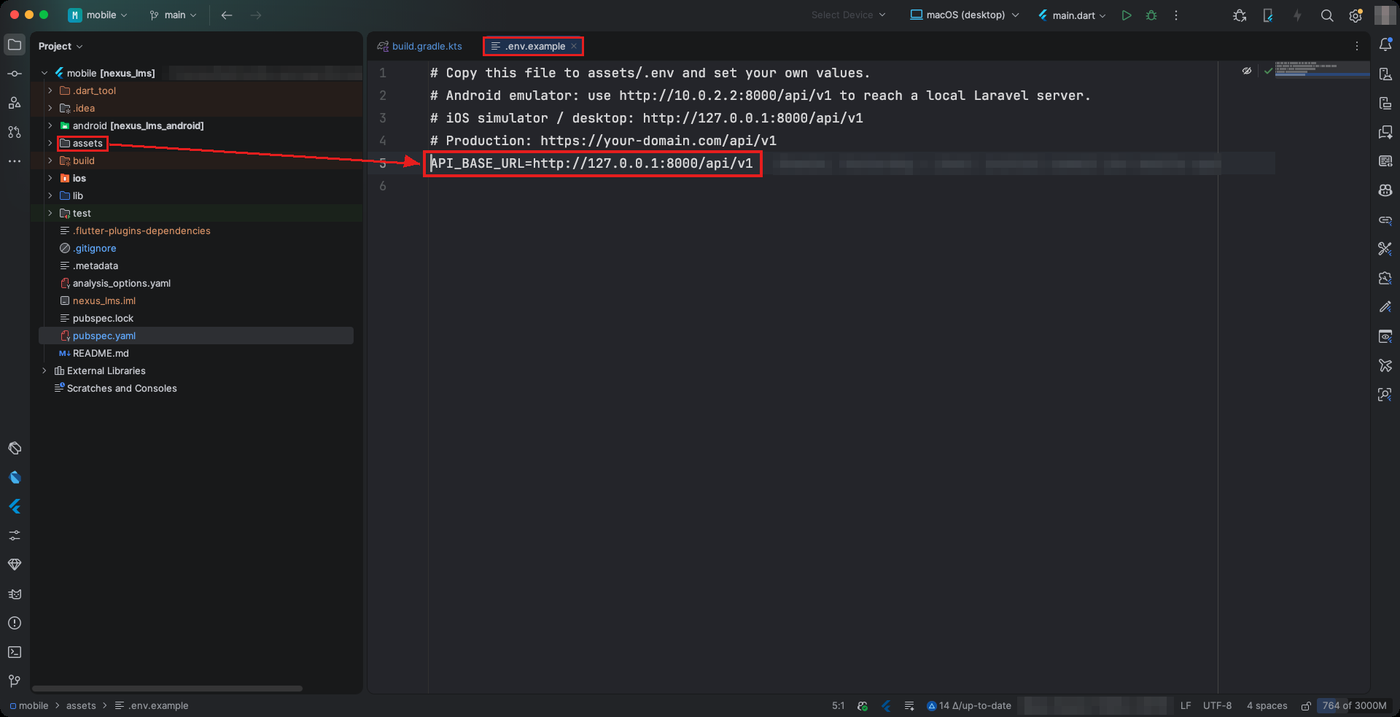
Figure 23: The API address is the API_BASE_URLline in theassetsfolder's.envfile. - Live server:
- Install packages and run:
flutter pub get
flutter run
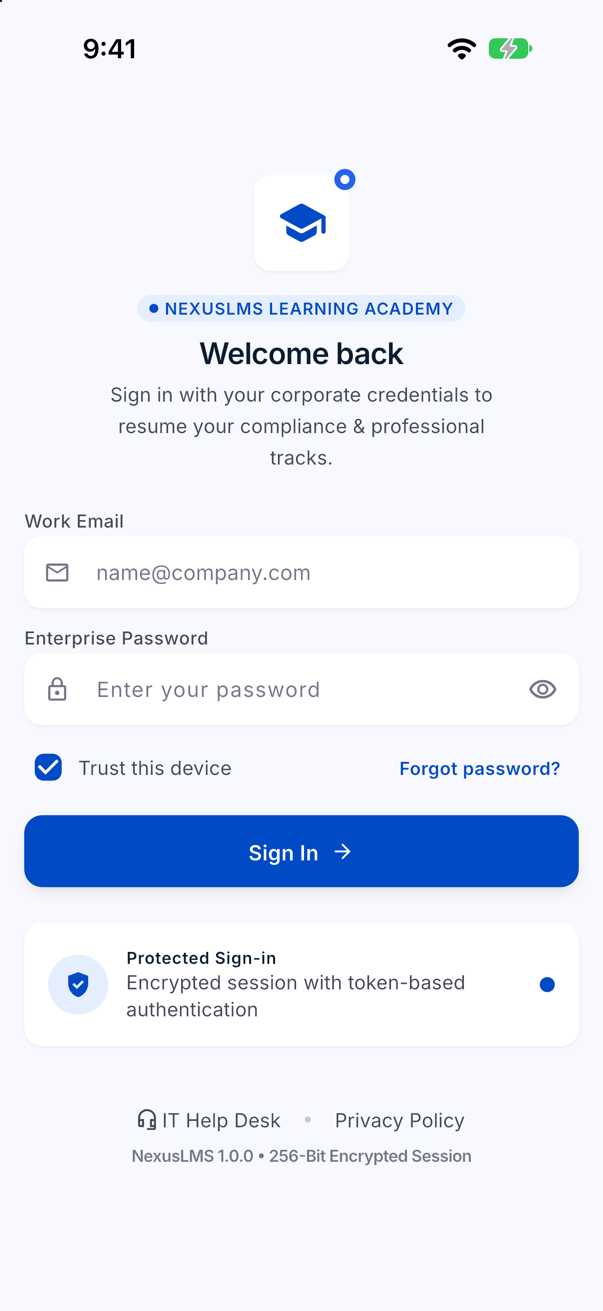
What the app looks like
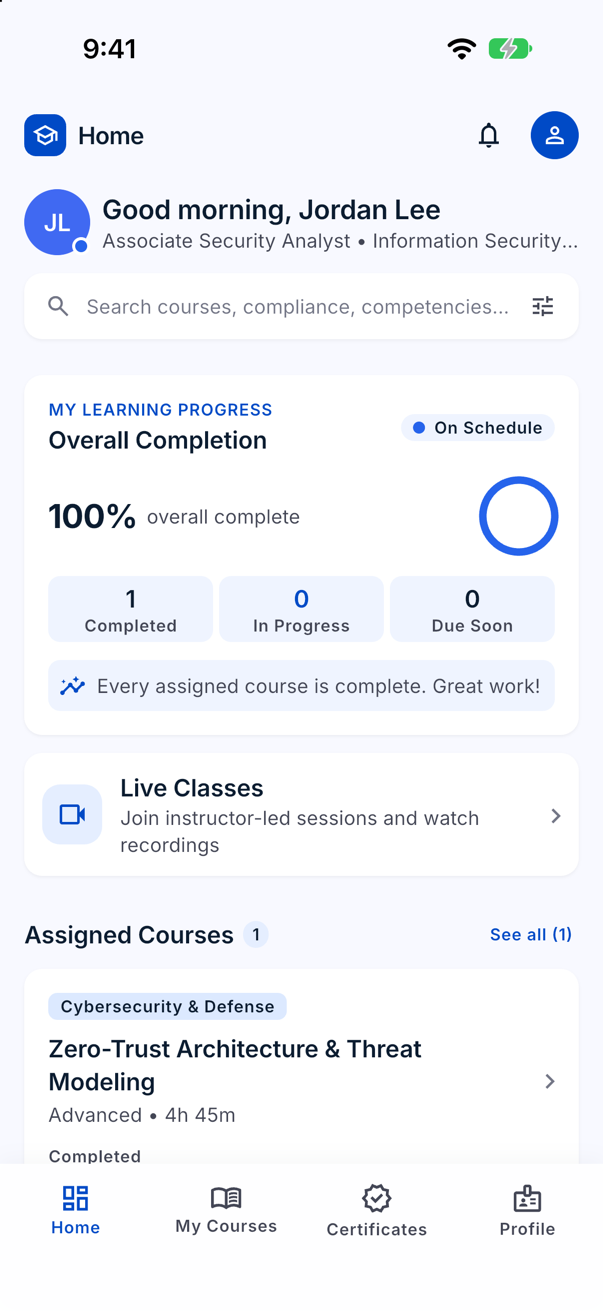
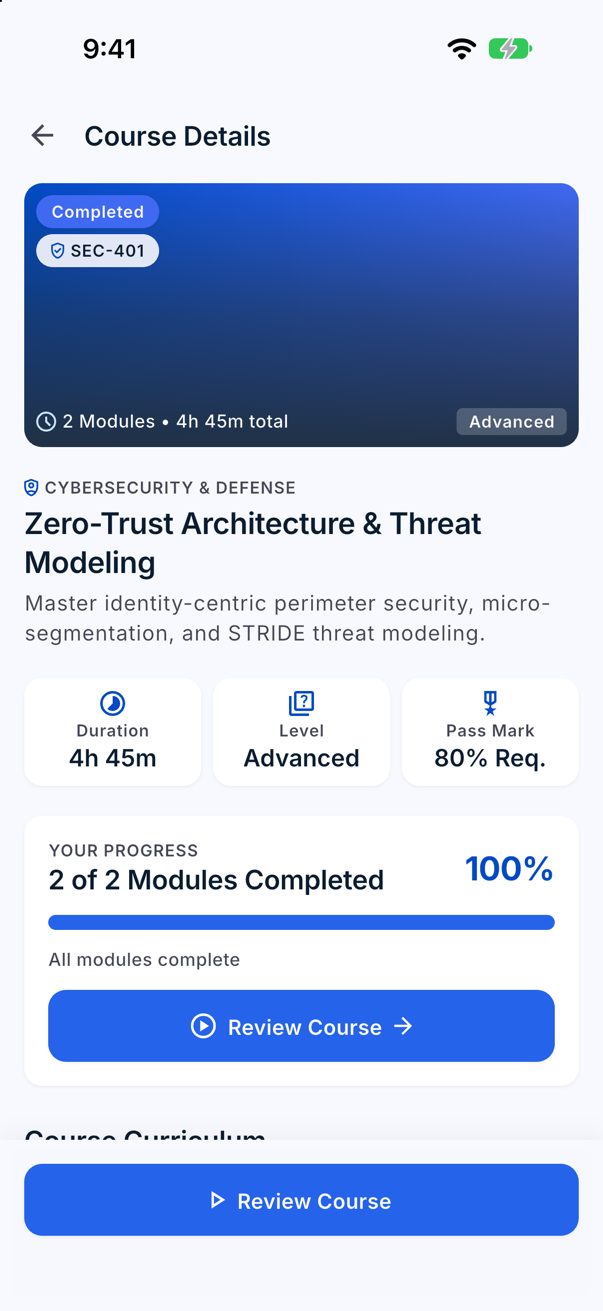
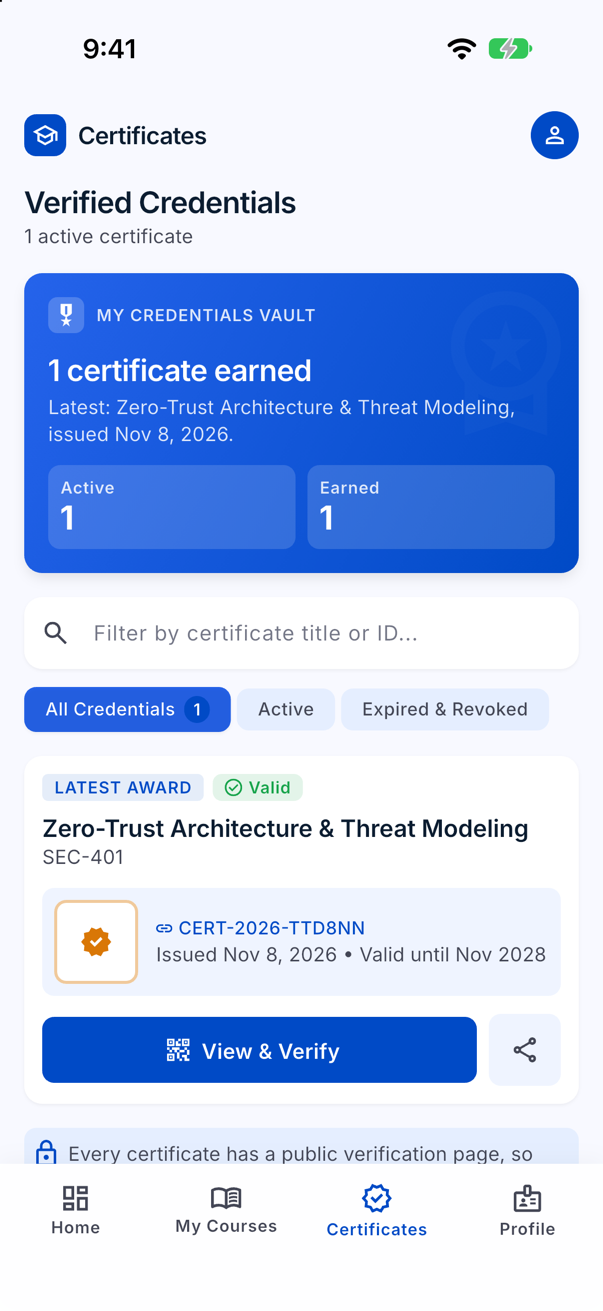
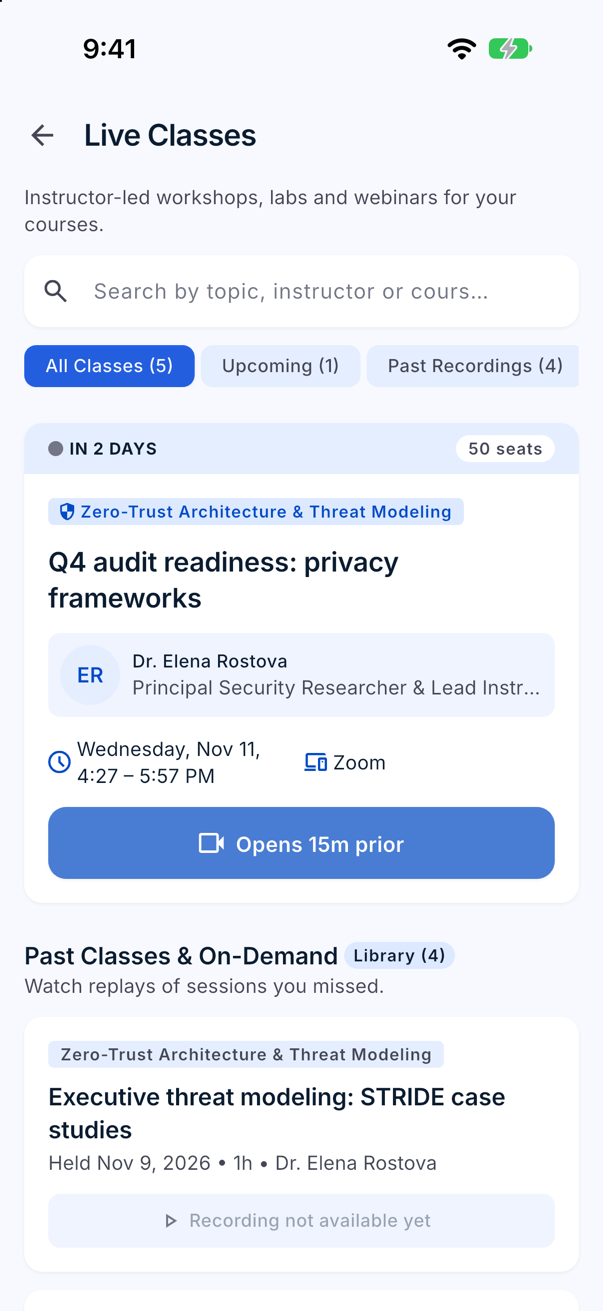
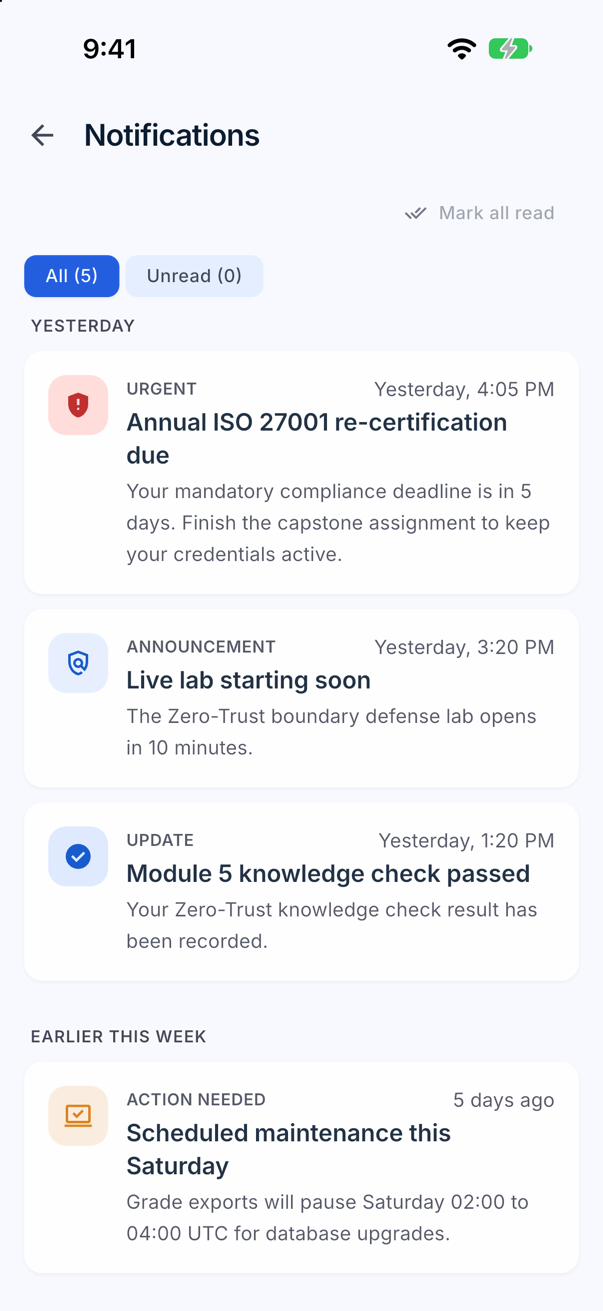
Testing on a real phone
On a phone on the same Wi-Fi as your computer, use your computer's network address, for example http://192.0.2.10:8000/api/v1, and start Laravel with php artisan serve --host=0.0.0.0. Plain http:// works only in debug builds; release builds need https://.
File structure
The app in main/mobile is organized by feature. Each feature has the same three layers, so once you know one feature you can find your way around all of them.
| Path | Purpose |
|---|---|
lib/main.dart | Starts the app: loads assets/.env, sets up Firebase when it is configured, and runs app.dart. |
lib/app.dart | The root widget: theme, the list of screens (routes) and the bindings that create each screen's controller. |
lib/core/config | env.dart reads API_BASE_URL from assets/.env. |
lib/core/constants | Colors (app_colors.dart), text styles, spacing, corner radius, shadows, image and icon paths, route names and shared text. |
lib/core/theme | app_theme.dart: the light and dark themes built from the constants. |
lib/core/network | The API client (api_client.dart), the list of API addresses (api_endpoints.dart) and the response format. |
lib/core/services | Sign-in token storage, saved preferences, push notifications, file picking, sharing, opening links and the video player. |
lib/core/error | Turns network and server errors into the messages people see. |
lib/core/ui, lib/core/utils | Navigation and snackbar helpers, and safe reading of JSON values. |
lib/shared/widgets | Widgets used on many screens: cards, buttons, search field, logo, icons, and the loading, empty and error views. |
lib/features/<feature> | One folder per part of the app: auth, splash, home, dashboard, courses, player, quiz, assignments, certificates, live_classes, notifications, profile and support. |
…/<feature>/data | datasources call the API, models read its JSON, and repositories combine them for the rest of the feature. |
…/<feature>/domain | entities (the plain data the screens use), the repository interfaces, and logic such as filtering and progress. |
…/<feature>/presentation | bindings (create the controller), controllers (GetX state), screens, widgets, and the screen's text in a *_strings.dart file. |
assets | .env.example (API address), app_icon (launcher icon source), fonts/inter (Inter with its license) and icons (SVG icons). |
android, ios | Platform projects: app name, package name and bundle ID, launcher icons, permissions and signing. |
test | 189 tests, laid out like lib, plus architecture_test.dart, which checks that the layers above stay separate. |
To add a screen, copy the layout of an existing feature: add its route name in lib/core/constants/app_routes.dart and register the screen and its binding in lib/app.dart.
Rename the app and package
App name
- Android: change
android:labelinandroid/app/src/main/AndroidManifest.xml.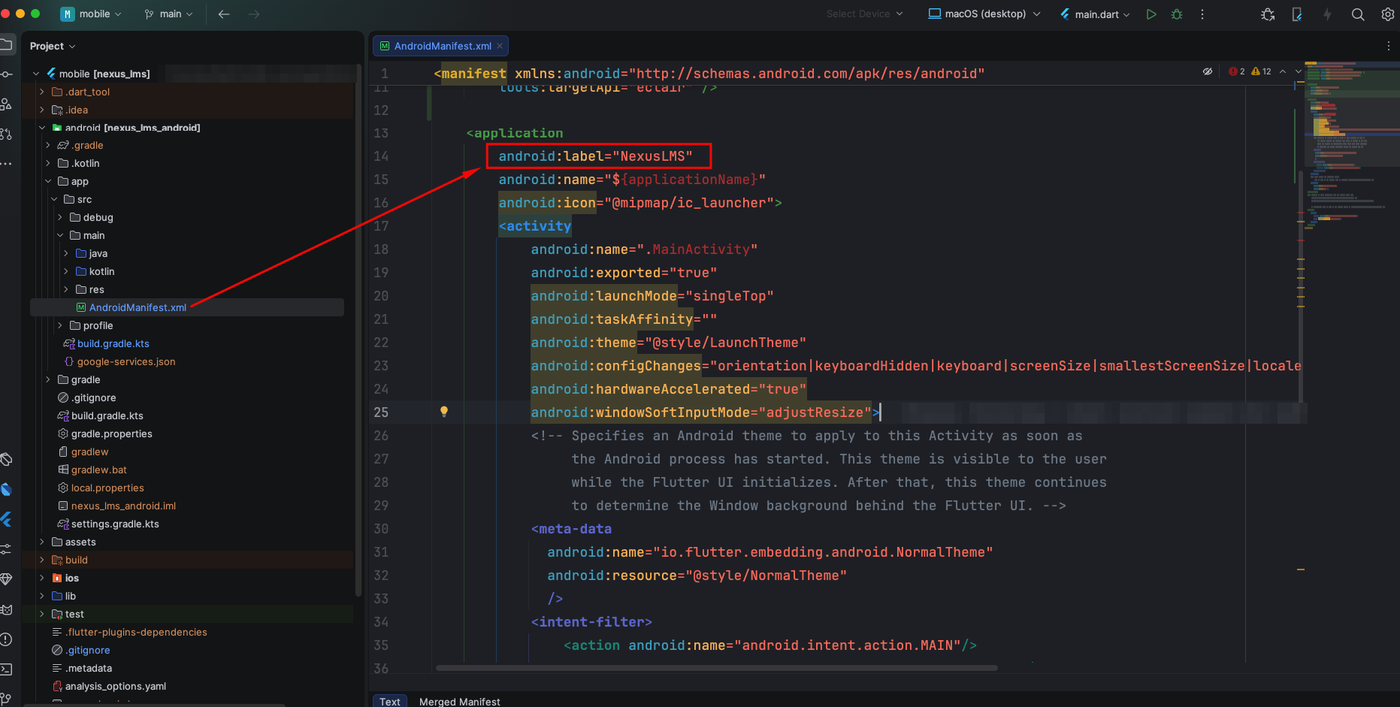
Figure 30: The Android app name is the android:labelvalue inAndroidManifest.xml. - iOS: open
ios/Runner.xcworkspacein Xcode, select the Runner target and set Display Name on the General tab (this writesCFBundleDisplayNameinios/Runner/Info.plist).
Package name (Android) and bundle ID (iOS)
- Android: change
applicationIdandnamespaceinandroid/app/build.gradle.kts, then moveMainActivity.ktto the matching folder underandroid/app/src/main/kotlin/and update itspackageline.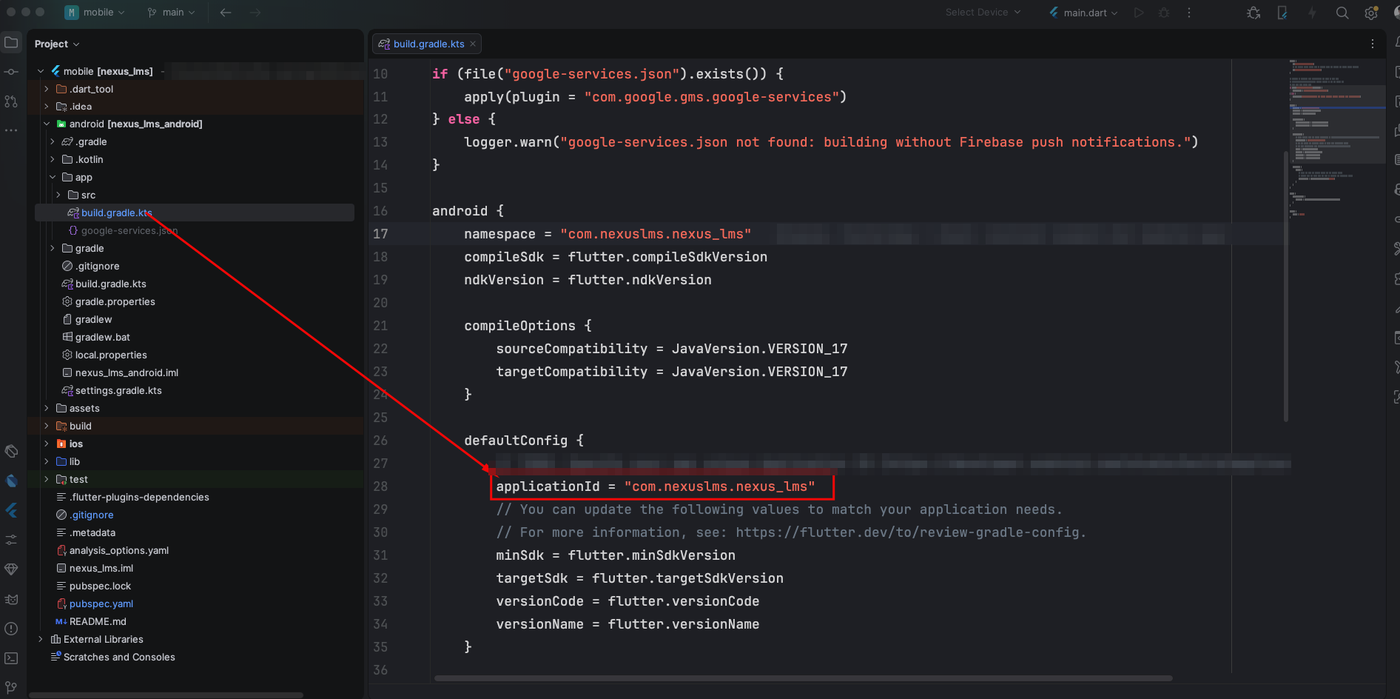
Figure 31: The Android package name is applicationIdinandroid/app/build.gradle.kts. - iOS: in Xcode, select the Runner target and change Bundle Identifier under General → Identity. Choose your team under Signing & Capabilities.
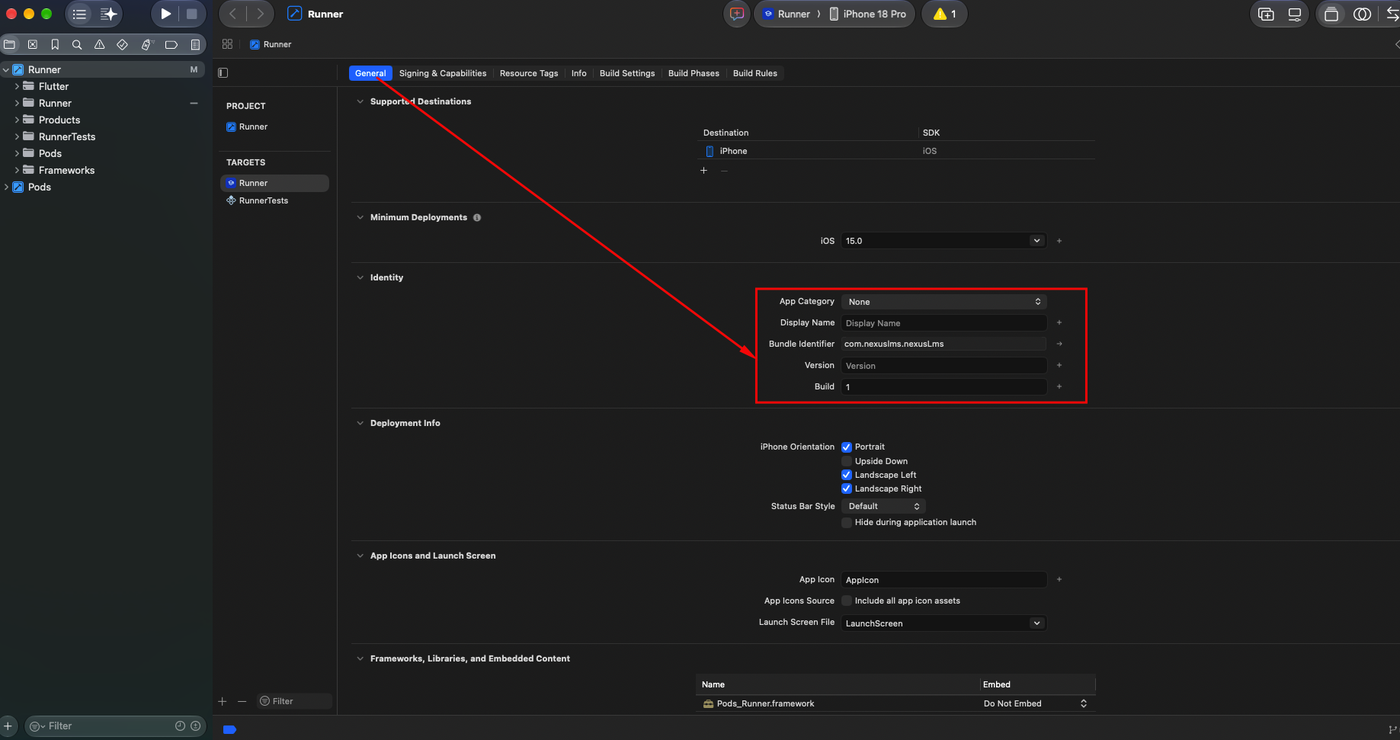
Figure 32: Display Name, Bundle Identifier and version in Xcode, under Runner → General → Identity.
Icon, colors and font
- App icon: replace
assets/app_icon/icon.png(1024×1024, no transparency) andassets/app_icon/icon_foreground.png(the Android adaptive icon foreground, with transparent padding), then rundart run flutter_launcher_icons. - Colors: edit
lib/core/constants/app_colors.dart. - Web logo: the admin panel, portal, installer and certificates use the same logo as the app unless you upload your own in Admin → Settings. To change the built-in one, replace
backend/public/assets/images/brand/logo.svg(andfavicon-32.pngandapple-touch-icon.pngin the same folder, pluspublic/favicon.ico). A favicon uploaded in Admin → Settings takes priority in the browser tab. - Font: the app bundles Inter in
assets/fonts/inter. To use another font, add its files there, update thefontssection ofpubspec.yaml, and changefontFamilyinlib/core/constants/app_text_styles.dart.
Release builds and signing
Android
- Create an upload key (keep this file and its passwords safe):
keytool -genkey -v -keystore ~/upload-keystore.jks -keyalg RSA -keysize 2048 -validity 10000 -alias upload - Create
android/key.properties:storePassword=your-store-password keyPassword=your-key-password keyAlias=upload storeFile=/path/to/upload-keystore.jksstoreFileis the full path to the keystore you created. On Windows, use forward slashes, for exampleC:/keys/upload-keystore.jks. Never commitkey.propertiesor the keystore; both are already inandroid/.gitignore.You don't need to edit any Gradle file.
android/app/build.gradle.ktsalready readskey.propertiesand signs release builds with it. Without the file, release builds fall back to the debug key, which Google Play does not accept.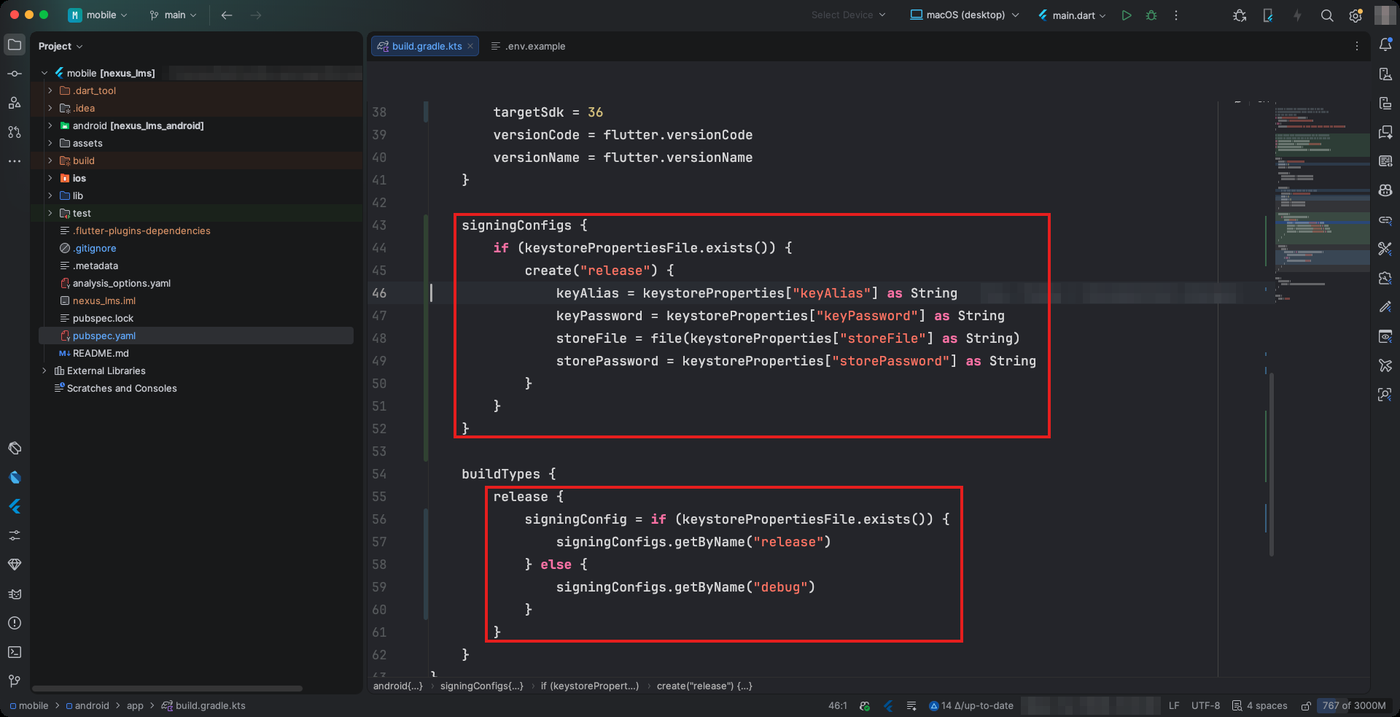
Figure 33: signingConfigsreadskey.properties; thereleasebuild type uses it. - Build the app bundle for Google Play:
flutter build appbundle --release
iOS
- Open
ios/Runner.xcworkspacein Xcode, select the Runner target, and under Signing & Capabilities choose your own team and bundle ID. - Push notifications need the Push Notifications capability, which requires a paid Apple Developer account. On a free personal team, remove
Runner.entitlementsfrom the target to build without push. - Build the archive for App Store Connect:
flutter build ipa --release
Push notifications (optional)
NexusLMS works without Firebase. Learners still see every notification in the app's notification list; Firebase adds pushes to the phone's lock screen.
1. Create a Firebase project
- Create a project in the Firebase console.
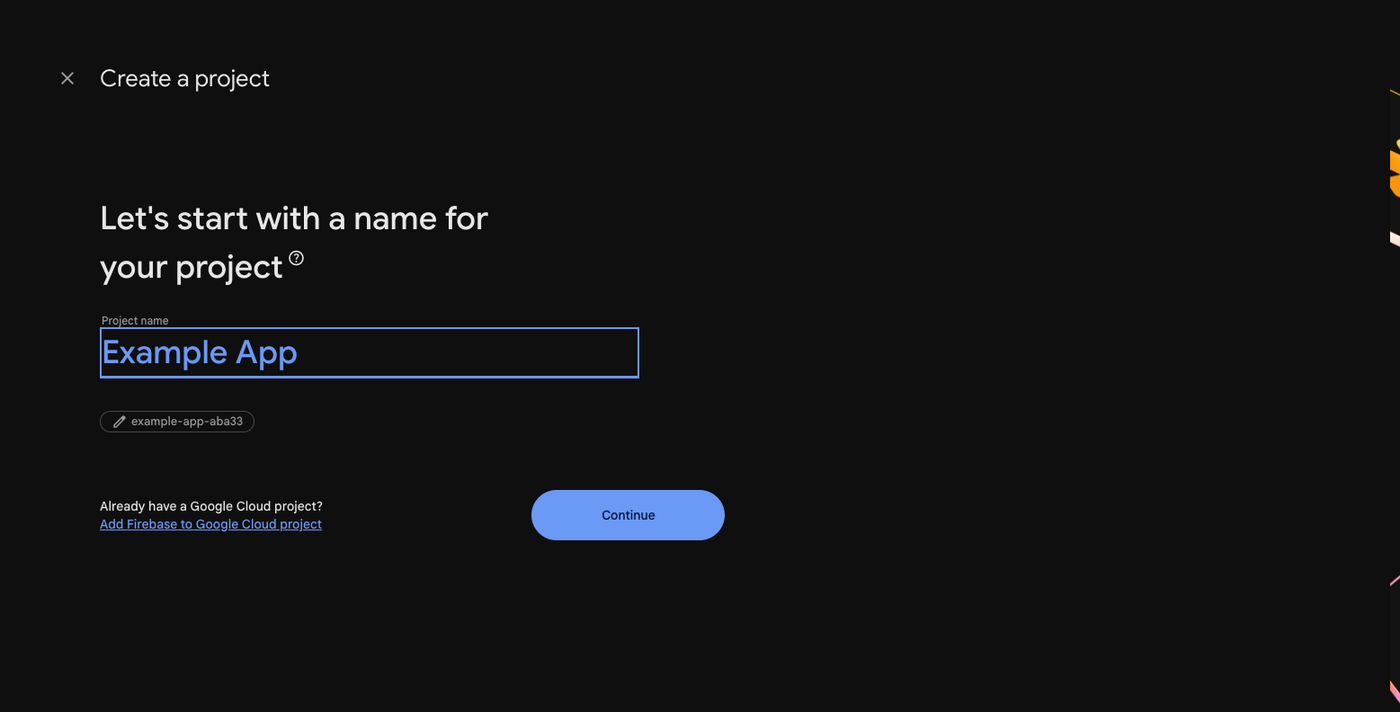
Figure 34: Create a Firebase project and give it a name. - Add an Android app with your package name (the same
applicationIdas above) and click Register app.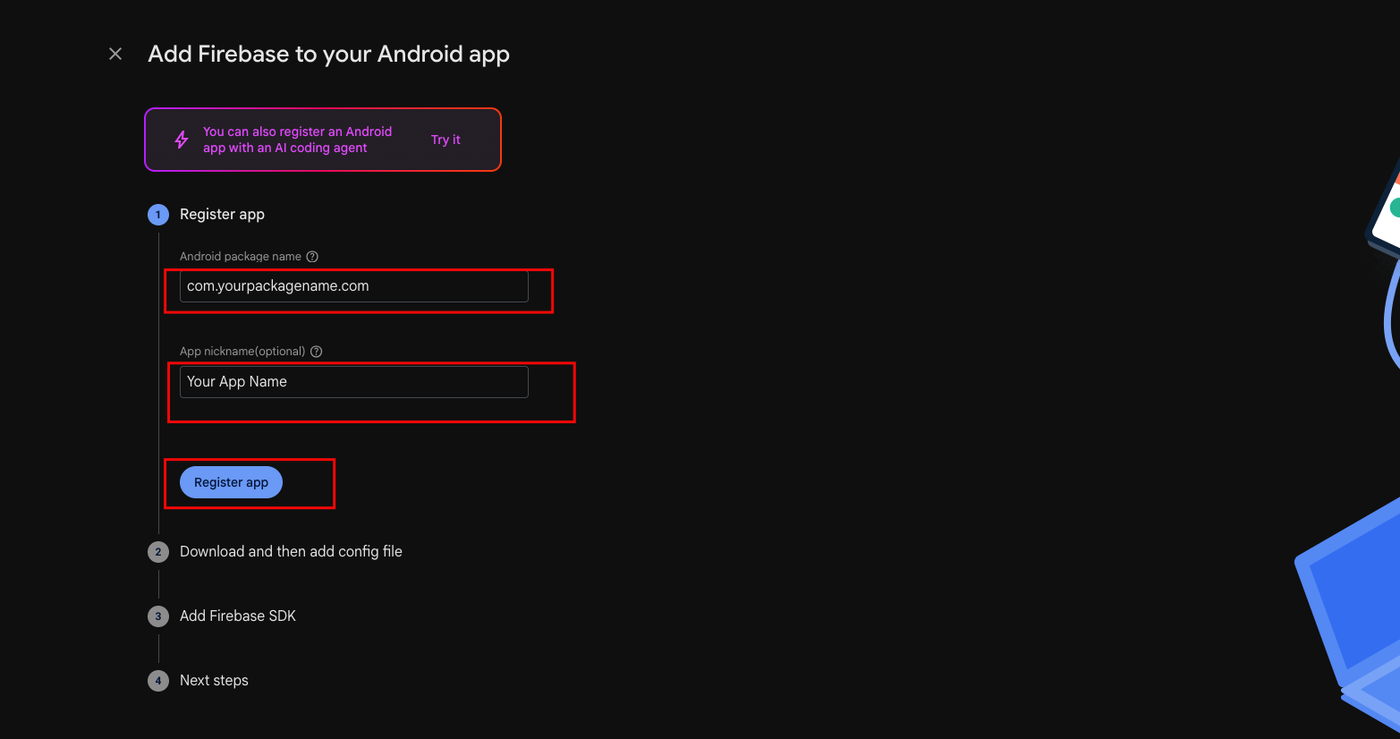
Figure 35: Register the Android app with your package name. - Download
google-services.jsonand put it inmobile/android/app/, next tobuild.gradle.kts.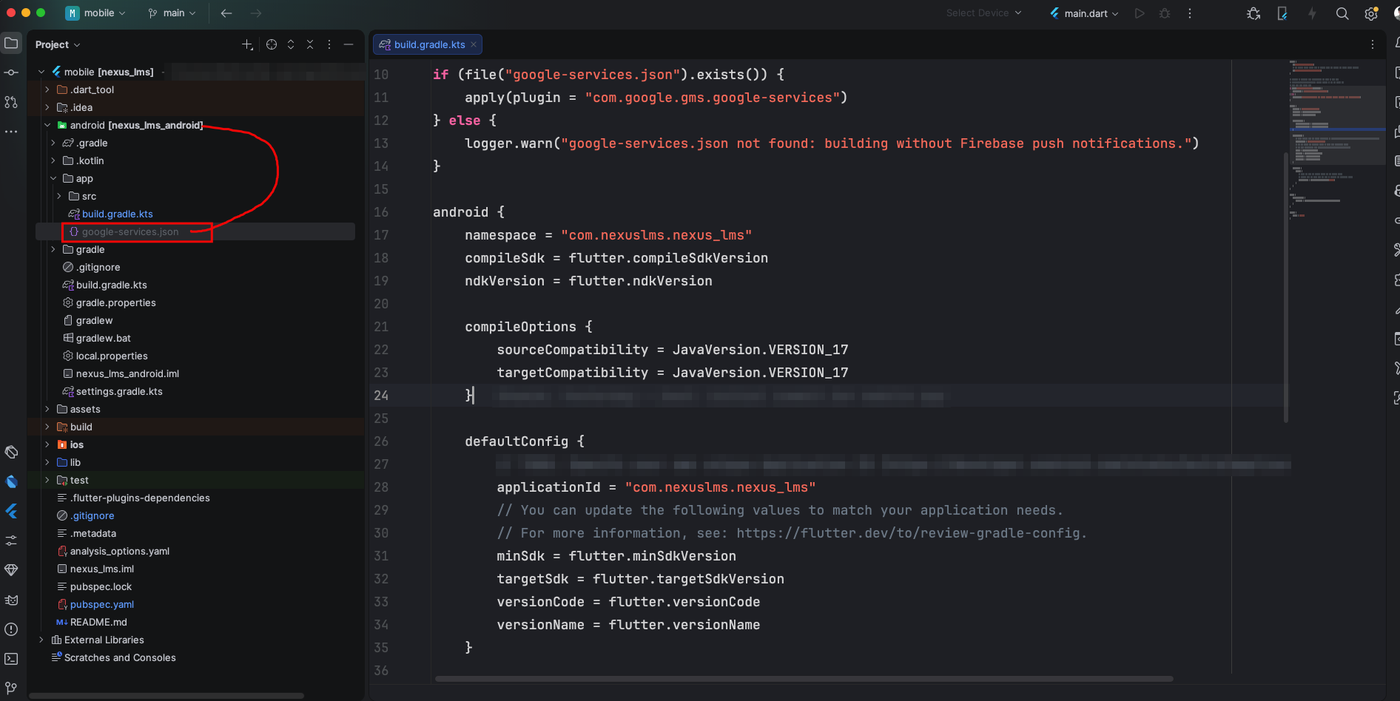
Figure 36: google-services.jsongoes inmobile/android/app/. - Add an Apple app with your bundle ID, then download
GoogleService-Info.plistintomobile/ios/Runner/.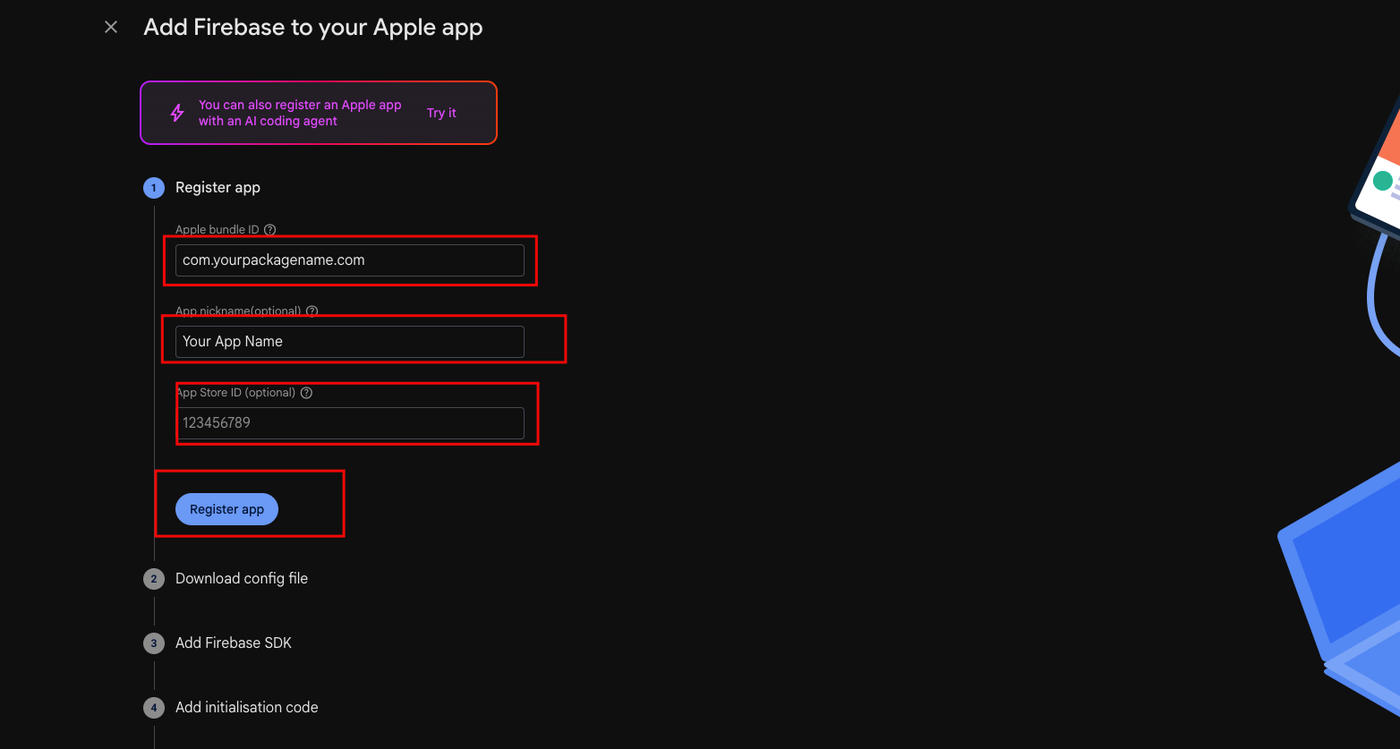
Figure 37: Register the Apple app with your bundle ID. - For iOS, open Project settings → Cloud Messaging, select your Apple app and upload an APNs authentication key (.p8) from your Apple Developer account.
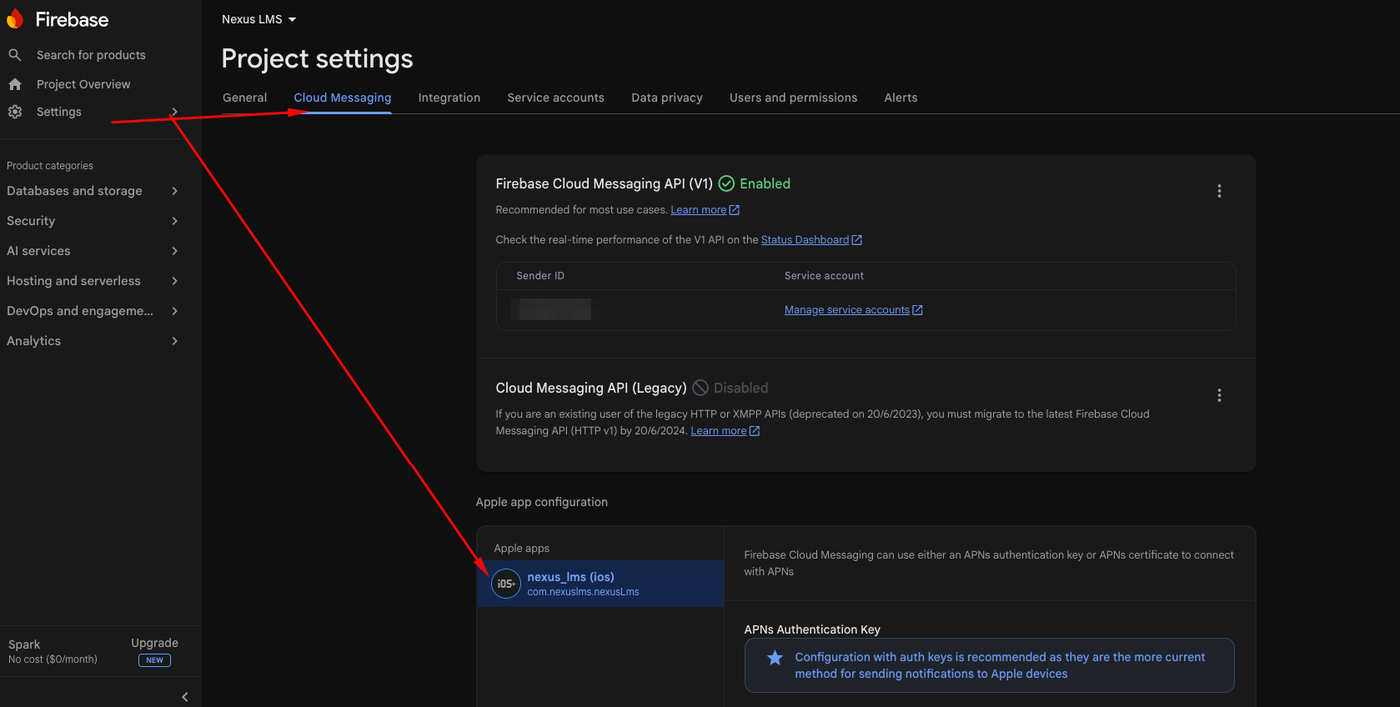
Figure 38: Cloud Messaging settings: select the Apple app. 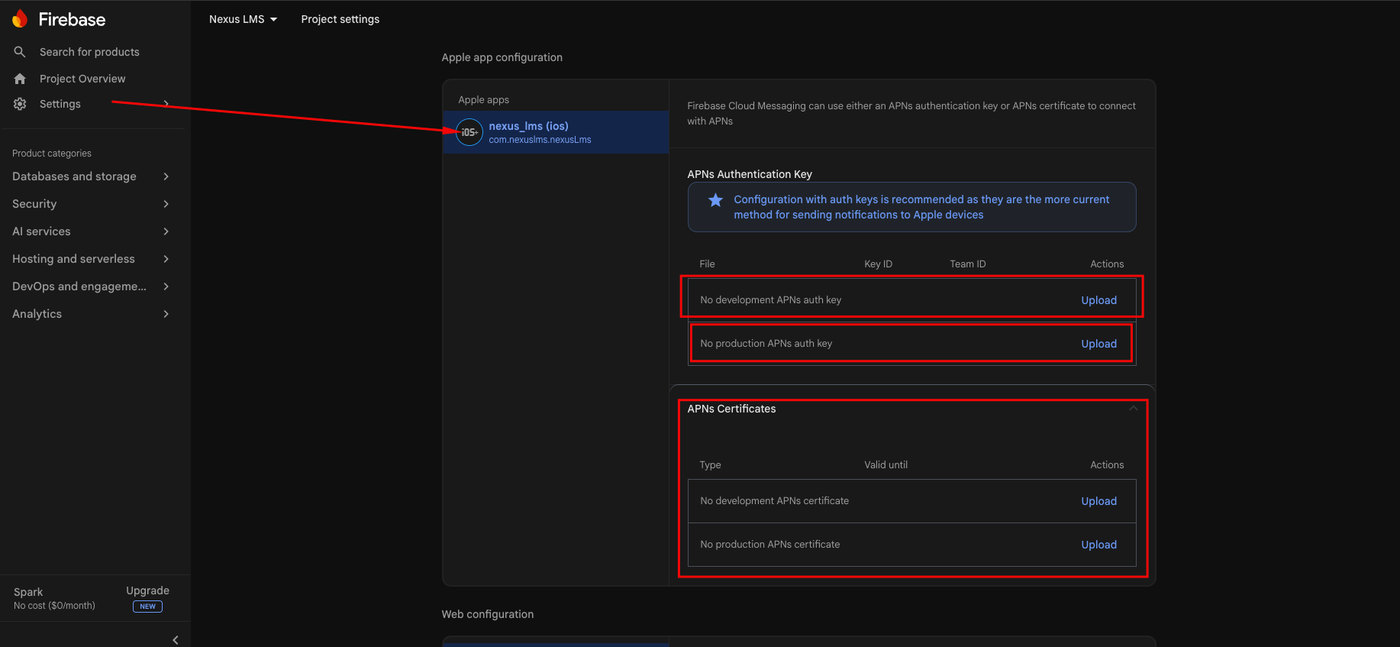
Figure 39: Upload the APNs authentication key (development and production).
The build picks these files up automatically. Without them, the app builds and runs with push turned off.
2. Connect the server
- In the Firebase console, open Project settings → Service accounts and click Generate new private key (a JSON file). Keep this file private.
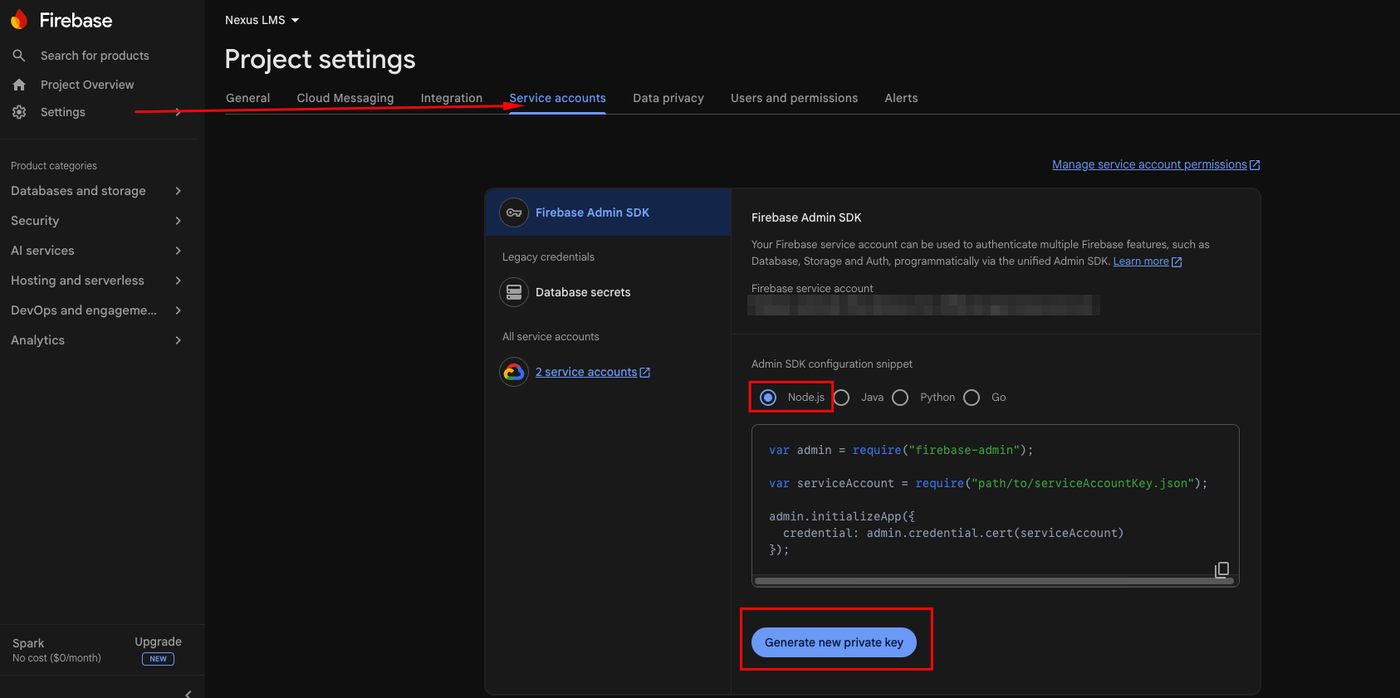
Figure 40: Generate the service-account key that the server uses to send pushes. - In Admin → Settings → Firebase, enable push, upload or paste that JSON file, and choose which events send a push: course assignment, assignment grading, certificates and live class reminders.
External services
| Service | When it is contacted |
|---|---|
| Firebase Cloud Messaging (fcm.googleapis.com, oauth2.googleapis.com) | Only when push notifications are configured. |
| Your mail server (SMTP) | Password reset and email notifications. |
| YouTube (youtube-nocookie.com) and Vimeo (player.vimeo.com) | When a learner opens a video lesson hosted there. Uploaded video files are served by your own server. |
| Meeting and video links | Live class links (Zoom, Teams, Google Meet) and recordings open the provider's site or app. |
Troubleshooting
| Problem | Solution |
|---|---|
| Blank page or "500 Server Error" | Check storage/logs/laravel.log. Make sure storage and bootstrap/cache are writable and that composer install finished. |
| Styles are missing | Run npm ci && npm run build so that public/build exists. |
| Uploaded images or files return 404 | Run php artisan storage:link. If your host does not allow symbolic links, ask your hosting provider to enable them. |
| Password reset emails do not arrive | Check the email settings and your mail provider's logs. |
| "Too many attempts" | Sign-in allows 5 attempts per minute for each email address and network address. Wait a minute and try again. |
| The app cannot reach the server | Check API_BASE_URL in assets/.env. Release builds need https://. |
| No push notifications | Check the Firebase files, the service-account key in Admin → Settings, the event switches, and (iOS) the APNs key. Push does not work on the iOS simulator without APNs. |
| Live class or due date reminders are not sent | Make sure the cron entry is installed. Due date reminders also need the switch under Settings → Security & Compliance. |
Frequently asked questions
Does it run on shared (cPanel) hosting?
Yes, as long as the host offers PHP 8.3+, MySQL, a cron job and symbolic links (for php artisan storage:link). You can run composer install and npm run build on your own computer and upload the result if the host has no terminal. A VPS works too.
Do I need a queue worker or Redis?
No. Emails and push notifications are sent right after each request finishes, so only the cron job is needed.
Is the mobile app required?
No. Learners can do everything in the browser through the learner portal. The app is an extra way to learn on the phone.
Do I need Firebase?
Only for push notifications. Without Firebase, the app and the website work normally and people still get email and in-app notifications. See Push notifications.
Can learners sign up by themselves?
No, this is a company platform: admins add people under Admin → Users. When you add one person you choose their first password and they get a welcome email; people added by CSV import get an email with a link to choose their own password.
How do I point the app at my server?
Set API_BASE_URL in main/mobile/assets/.env to your site's address followed by /api/v1, then stop and run the app again. See Mobile app setup.
How do I change the name, logo and colors?
For the website, use Admin → Settings → General & Branding (see White-labeling). For the app, see Rename the app and package and Icon, colors and font.
Should I import the demo data on my live site?
No. Demo data is for trying the platform: the sample accounts have default passwords that are the same on every installation. Leave it off in the installer, or delete those accounts before you invite real people.
Support
If you run into a problem or have a question, many answers are already in Troubleshooting & FAQ.
For anything else, use the Support tab on the NexusLMS item page on CodeCanyon. Item support follows Envato's item support policy: questions about the item and fixes for reported bugs. Customization, installation on your servers, and third-party services such as your mail provider, Firebase, Apple and Google Play accounts are outside item support.
To help us answer quickly, tell us:
- what it is about: the backend and admin panel, the learner portal or the mobile app, and Android or iOS;
- the exact error message, and the step or command that caused it;
- your versions: the NexusLMS version (at the bottom of the admin menu),
php -vfor the backend andflutter --versionfor the app; - for a server error, the last lines of
storage/logs/laravel.log, with passwords and keys removed; - what you have already tried from this documentation.
Credits and licenses
Server
| Package | Version | License |
|---|---|---|
| Laravel Framework | 13.40 | MIT |
| Laravel Sanctum | 4.3 | MIT |
| Laravel Tinker | 3.0 | MIT |
| spatie/laravel-permission | 8.5 | MIT |
| Alpine.js | 3.17 | MIT |
| Tailwind CSS | 4.3 | MIT |
| Vite and laravel-vite-plugin | 8.3 / 3.2 | MIT |
Fonts Inter, Playfair Display, Cinzel, Great Vibes and JetBrains Mono (bundled in public/fonts, licenses in the OFL-*.txt files there) | – | SIL Open Font License 1.1 |
Mobile app
| Package | Version | License |
|---|---|---|
| Flutter | 3.44 | BSD-3-Clause |
| get | 4.7.3 | MIT |
| dio | 5.11.1 | MIT |
| cached_network_image | 4.0.3 | MIT |
| file_picker | 13.3.2 | MIT |
| firebase_core | 5.1.0 | BSD-3-Clause |
| firebase_messaging | 17.0.1 | BSD-3-Clause |
| flutter_dotenv | 6.0.1 | MIT |
| flutter_secure_storage | 11.2.0 | BSD-3-Clause |
| flutter_svg | 2.3.2 | MIT |
| flutter_widget_from_html_core | 0.17.4 | MIT |
| intl | 0.20.2 | BSD-3-Clause |
| share_plus | 13.3.1 | BSD-3-Clause |
| shared_preferences | 2.5.6 | BSD-3-Clause |
| url_launcher | 6.3.3 | BSD-3-Clause |
| video_player | 2.14.1 | BSD-3-Clause |
| webview_flutter | 4.14.1 | BSD-3-Clause |
Inter font (bundled, license in assets/fonts/inter/OFL.txt) | 4.1 | SIL Open Font License 1.1 |
Material Symbols icons by Google (SVG files in assets/icons, license in assets/icons/LICENSE-material-symbols.txt) | – | Apache License 2.0 |
AI disclosure
AI tools (Claude by Anthropic) were used to help create this item's code, documentation and graphics, including the demo course artwork and the preview images. The author reviewed, edited and tested all of it; the screenshots show the real, working product.
Changelog
1.0.0
- Initial release.